> Overview |
Last
revision of this document: |
This
document describes
* the creation of a database,
* giving
rights to other users and
* installing the JAR (JavaArchive) -file
with the package to connect to the database from a JAVA-application
Credits:
I
derived the guideline how to configure a database with access rights
and how to install the 'connector' for java from:
www.developer.com/java/data/article.php/3417381.
MySQL
database installed as described in document Linux
- Databases.
The descriptions in this document assume that
an user 'mysql' exists.
Creating
a table and granting rights to a user:
Open
a Terminal-window and log-on to the MySQL database-system with the
following command:
mysql
--user=root mysql
This
command can be issued from any logged on user-ID - it is not
necessary to log on as 'root' first.
It logs on the
administrative user 'root' to the database 'mysql'.
The database
'mysql' has the special purpose to hold all data to maintain the
database-system.
So it also holds the information about all
databases available for application-development.
The
MySQL monitor starts and waits for input in SQL-syntax.
This
allows to create a database. As a
database named js_tutorial
is
needed for the tutorial JS_Base02e
- Connect to the database
, it will
be created:
Make
sure that the SQL-command is ending with a semicolon (;) - otherwise
the monitor waits for a continuation of the same command.
As
the user 'root' should only be used for administration and not for
business-applications, the rights to manipulate the database are
given to the user 'mysql' (which was created in lesson Linux
- Databases):
Please
note that the semicolon (;) is on the second line of the input as
the SQL-command stretches over 2 lines.
A
short explanation of the elements of the above SQL-statement.
GRANT
ALL
Defining that all manipulation-rights are given.
As this is the complete set of manipulations, the user can do
anything toward the database.
This extensive rights are given,
as within a tutorial it should be possible to do all
database-operations.
For an operational database with sensitive
data, 'GRANT
ALL'
is far too much and the
manipulation rights must be chosen more restrictive.
A more
detailed explanation would outreach this document.
I recommend
to consult a database-specialist concerning security issues
protecting sensitive data
ON
js_tutorial.*
Defining
to which tables of the database the manipulation-rights are
given.
As the table-part of the database is an asterisk (*), the
rights are given to all tables within this database
(js_tutorial).
TO
'mysql'
The
manipulation-rights are given to user mysql
.You
might have seen in other tutorials, that also a host-name (usually
'
localhost') was specified - restricting
the user to access from the machine where MySQL is running on.
This
gives problems on machines connected to a network as they are
usually given another hostname.
For tutorial
purposes it is fine enough, to give access from every machine in a
network.
MySQL allows a very fine granulated rights-management
concerning the machines from which database-manipulation is
allowed.
For detailed information please consult the
Administration-Documentation of MySQL.
IDENTIFIED
BY 'drowssap'
When connecting to the database, the
user must also provide a password - which can be freely chosen and
is the reversed spelling of password in this example.
Verifying
the correct creation of the database and granting the rights:
Verify,
that the user was created succesfully, issuing the following
SQL-command and check, that a row in the table exists:
To
terminate the SQL-Monitor enter
mysql>
quit
Log-on
again to the MySQL database-system with the following command:
mysql
--host='127.0.0.1' --user='mysql' --password='drowssapp'
js_tutorial
and the
SQL-monitor will start again.
Please be aware:
MySQL
needs the TCP/IP-address of host - even if you are accessing the
MySQL-server from the same machine it is running.
In that case
the TCP/IP-address for 'localhost' (127.0.0.1) has to be given !
To
log-on from another machine in the network the command looks like
this:
mysql
--host='192.168.0.1' --user='mysql' --password='drowssapp'
js_tutorial
assuming
that the MySQL-server is running on the machine with TCP/IP-address
'192.168.0.1' .
If
there is a danger that somebody is looking over your shoulder to
steal the password, you might
use the following command:
mysql
--host='192.168.0.1' --user='mysql' -p js_tutorial
MySQL
replies with a query that lets you enter the password in a field
that does not show the entered characters.
The
manipulation of the database via the SQL-monitor will be covered
mainly in the tutorials showing the connection of a database to
JAVA.
Install
the JAR (Java-ARchive) with the package to connect to a
MySQL-database.
Depending
on the folder under which 'mysql-connector-java-3.1.2-bin.jar' should
be stored, your user rights may not be sufficient.
If you
experience problems during saving the file either do the download
with 'root'-rights or save to a folder you are allowed to save.
The
most current version of the Java-Connector (3.1.12 at the last
revision of this document) can be downloaded from the following
internet-site:
http://dev.mysql.com/downloads/connector/j/3.1.html.
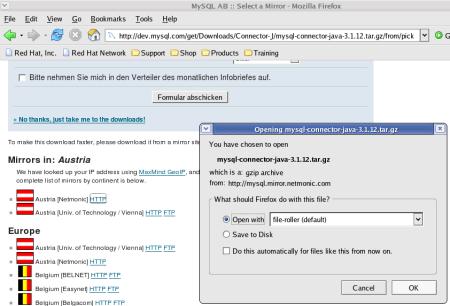
Pick
a mirror for the 'Source and Binaries (tar.gz).
Unfortunately,
the requiered file is in compressed format.
Click onto 'HTTP' or
'FTP' link to inspect the contents.
Leave the proposed
application 'file-roller' and click the [ OK ] button.
Move
to the folder 'mysql-connector-java-3.1.12' to see the requested
'
mysql-connector-java-3.1.2-bin.jar
'
Use
>Edit>Copy
to pick the file for later 'paste'.
Use
the File Browser to 'paste' the file onto its final destination.
I
used the directory '/usr/java/j2sdk1.4.2_08/lib/extern' - and will
refer to it in further steps.
This directory can only be
write-accessed with rights as 'root'.
Related
Documents: