Setup of Printers
Prerequisites
to understand the content of this document:
*
General knowledge how to enter a command on the command-line;
respectively hot to start applications using a GUI
|
Approximate
expenditure of time to work over this document:
Time
to work on: ca. 30 minutes for each alternative installation.
|
This
document contains the description how to 'config' an attached
printer; i.e. select the fitting driver for the given manufacturer
and model and change the driver-parameters, if necessary.
It
is also considered, that a GUI (Graphic User Interface) might not be
available – e.g at a not so powerful computer been used as
Router.
Additionally,
a bugfix is described to correct an error in RedHat Linux version 9.
|
Important Notice
if CUPS is used !
The
Printer Configuration described within this document may –
unter circumstances not yet known in detail – change the
configuration of CUPS (see Configuration
and Usage of CUPS).
Thereafter the usage of the CUPS-Server (daemon) from other
Computers within the network is blocked again; i.e. it is no
longer allowed to send print-jobs to the CUPS-Server.
This
experience was encountered using Fedora Core 5 – but might
happen with other versions too.
|
Overview
Preface
Prerequisites
Printer
Configuration with GNOME-GUI
Printer
Configuration if GUI is not available
SAMBA-Bugfix
in RedHat Linux Version 9
Preface
Things,
they are changing – that is also true for the
development-progress of Linux.
The appearance of the GUI (Graphic
User Interface) and description of the menu and applications are
changing slightly from version to version.
The screenshots within
this document were made from a RedHat**-Linux version 8.0 (published
in 2001).
Therefore following versions (till Fedora Core 7 in
2007) will look significantly different.
Nevertheless, the task
and the sequence of the installation stayed the same.
Don't be
confused if appearance and description in the version you are using
do not completely fit this description.
If you progressed through
the installation of Linux till here, the Configuration of a Printer
should not be an insuperable handicap for you ;-) .
Prerequisites
Logged
on as user 'root'.
Valid for both methods.
Printer
Configuration with GNOME-GUI
Preparation:
Running automatic Hardware Detection
Configuration
of Pinters can shortened if the connected printer was already
recognized by the Hardware Detection.
Hardware Detection starts
shortly after Linux started the boot-process.
If you recently
connected a printer, switch it on and watch the boot-process of
Linux.
If Hardware Detection recognizes the printer you are asked
to confirm the configuration of the printer.
Start of
the Printer Configuration
|
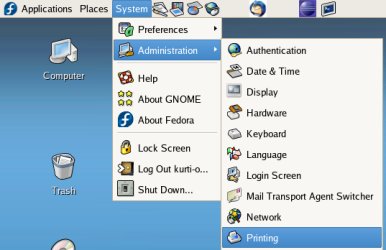
The
			application to configure a printer is started by the selection
			of
System
			– Administration - Printing
.
|
|
|
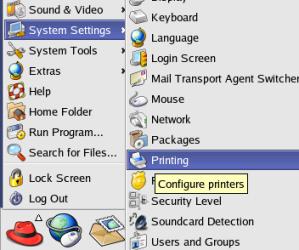
On
			older versions you might find that the application to configure a
			printer is started by the selection of
Menu
(red
			Hat)
– System
Settings - Printing.
|
|
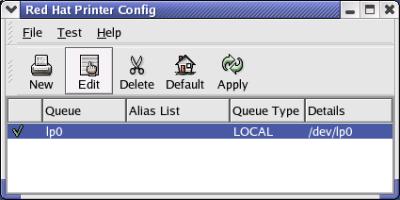
Display
with detected, respectively not detected printer
|
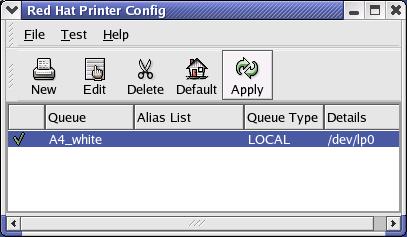
If
the printer was already configured by the Hardware Detection
program, it is already listed in the display.
If
you want to change the symbolic name of the Queue, please click
onto the icon [Edit]
and
continue with the next step (Rename
the QueueName);
otherwise continue with Review
Driver Options fort.
|
If
the printer was not found by the Hardware Detection the following
display appears.
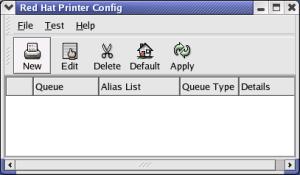
In
that case please click ontot the icon [New]
and
continue with the step Add
a new Print Queue .
|
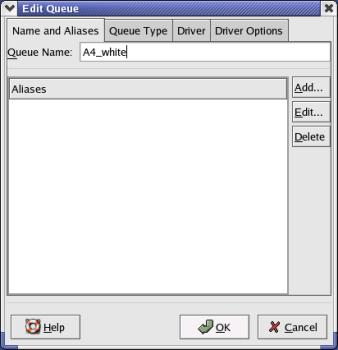
Rename
the Queue Name
|
After
			clicking the icon
[Edit]
a
			new window opens.
Within
			this window you might change the 'Queue Name'. This name is shown
			in lists to choose a printer from when a print-job is started.
In
			this example the 'Queue Name' was changed from
lp0
to
A4_white
.
By
			clicking onto the icon
[OK]
the
			window will be closed again.
Please
			continue with the step
Review
Driver Options.
|
|
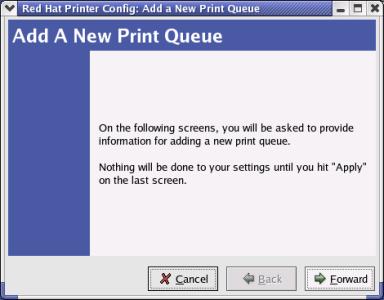
Add
a new Print Queue
|
If
the printer was not recognized and configured by the Hardware
Detection, configuration of the printer will be started by
clicking onto the icon [New]
and
a new window will appear.
This
windows contains the information, that the configuration of your
printer will be started by clicking onto the icon [Forward].
|
|
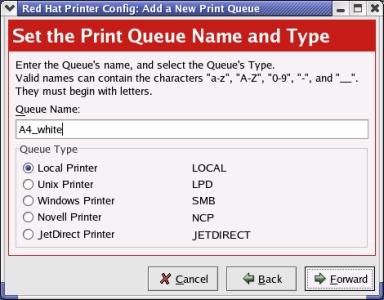
Set the
Print Queue Name and Type
|
This
window allows to set the 'Queue Name' and 'Queue Type'.
In
this example the 'Queue Name' A4_white
was
chosen.
Furthermore
the information, how the printer is connected to the computer. As
this document covers only printers, that are directly connected to
a PC, 'Local Printer' is selected.
The
next step of this installation instruction is reached after
clicking onto the icon [Forward]
.
|
|
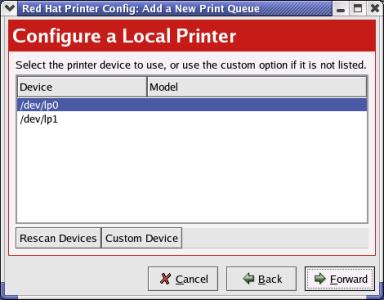
Configure
a Local Printer
|
Within
this step, the choice, at which interface the printer is connected
has to be made.
The
PC used for this example has 2 printer-interfaces of type
'parallel' – which are shown for selection.
If the PC
would have been equipped with an USB-connection, this choice would
also have been listed.
After
chosing the correct interface, please click onto the icon
[Forward]
to
go to the next step.
|
|
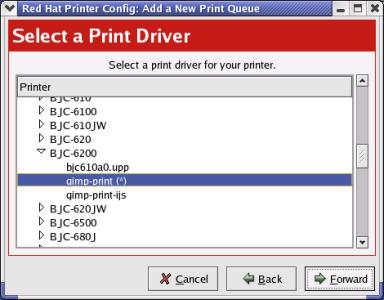
Select a
Print Driver
|
The
driver for the attached printer is determined within this step.
For
this purpose, manufacturers are listed (not visible any more at
that example).
By clicking onto the triangle left of the
manufacturers name, all printer-models, where a driver is
contained in the installed Linux-package, are listed below the
manufacturers name.
With a further click onto the triangle left
of the printer-model, all available drivers are listed.
The
recommended driver is marked by (*)
.
Possible
pitfall:
Selecting
just the printer-model is not sufficient; there has to be selected
a driver too.
If
your printer-model is not listed:
If
you installed an older version of Linux (e.g. RedHat Version 8.0
for the 'Router') it might occur that your newer printer-model is
not listed.
That
is not a problem as long as you do not want to start a printout
from the PC the printer is connected to.
Either
choose a predecessor-model of the same manufacturer
or select
'Raw Print Queue' (at top of the list, before the manufacturers
list start).
Control of the printer is then handed over to the
workstation-PC that is accessing the printer.
If there a
correct driver for the printer is installed (e.g. with a newer
version of Linux or Windows), the printer receives correct
preprocessed data.
The
final step of the installation will be reached by clicking onto
the icon [Forward]
.
|
|
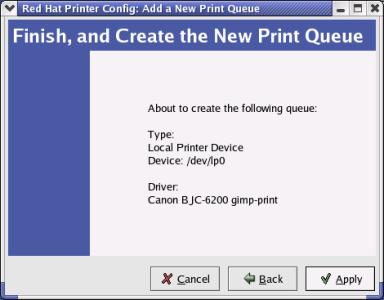
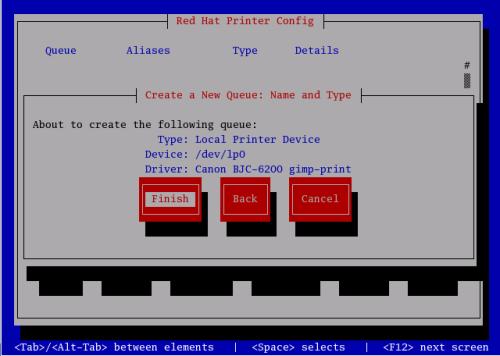
Finish
and Create the New Print Queue
|
Finally,
a summary of the installation just carried out is shown.
The
window will be closed by clicking onto the icon [Apply]
.
|
|
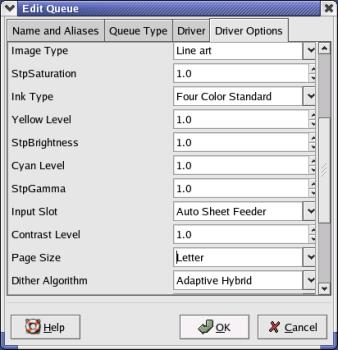
Review
Driver Options (Page Size, etc.)
|
By
selecting the printer and clicking the icon [Edit]
at
the window for the Printer Configuration, a new window with
possible adjustments will be opened.
The
appearance depends highly on the configured printer-driver and
might be highly different at your installed printer.
Usually,
the values are set automatically.
It is recommended to review
the following values:
Page
Size:
This value is set depending on the selected language (e.g.
'A4' for Deutsch (German), 'Letter' for English) and might
therefore be different from the paper used.
Ink
Type (print-heads):
This value is changeable if the print-heads of the printer can
be changed (e.g. 'Black Only', '4-Color', 'Photo').
This
window will be closed by clicking onto the icon [OK]
.
|
|
Store
(Apply) of the changes made
|
By
clicking onto the icon [Apply]
changes
will be stored and become valid.
A
confirmation window (no illustration shown) will appear
thereafter.
|
|
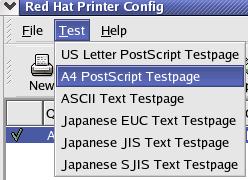
Testing
the printer
|
The
print-out of a test-page will be started by selecting Test
and
the desired page-size thereafter.
|
|
▲ to
overview
Printer
Configuration if GUI (Graphic User Interface) is not available
Preparation:
Running automatic Hardware Detection
Configuration
of Pinters can shortened if the connected printer was already
recognized by the Hardware Detection.
Hardware Detection starts
shortly after Linux started the boot-process.
If you recently
connected a printer, switch it on and watch the boot-process of
Linux.
If Hardware Detection recognizes the printer you are asked
to confirm the configuration of the printer.
Instruction
how to operate the 'Buttons' at the text-based windows
Wif
you are accustomed to operate a GUI (Graphic User Interface) with a
mouse, the text-based 'windows' might be unfamiliar..
Different to
using a mouse, 'Buttons', 'Radio-Buttons' and the selection within
'Lists' are selected by the Tab-key (-->|) and with the Enter-key
a 'mouse-click' is simulated.
Start
the Printer-Configuration
The
text-based installation at Fedora-versions
is
started with the command
system-config-printer
.
The
text-based installation at RedHat-versions
is
started with the command
redhat-config-printer
.
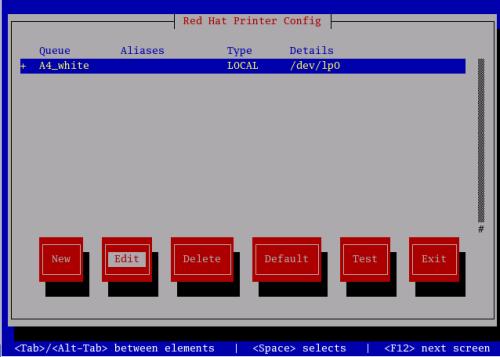
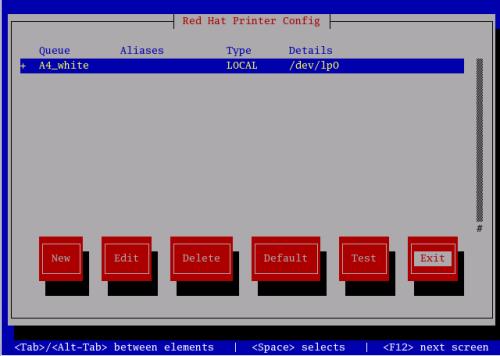
Display
with detected, respectively not detected printer
|
If
the printer was already configured by the Hardware Detection
program, it is already listed in the display.
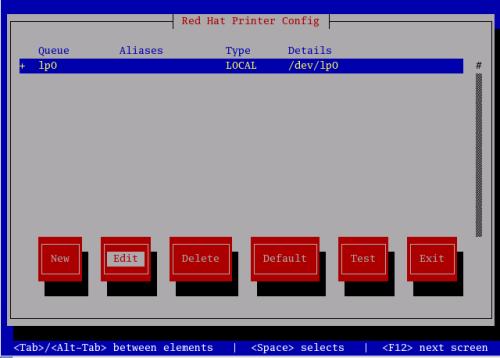
If
you want to change the symbolic name of the Queue, please select
[Edit]
and
continue with the next step (Rename
the Queue-Name);
otherwise continue with Review
Driver Options.
|
I
the printer was not found by the Hardware Detection, the following
display appears.
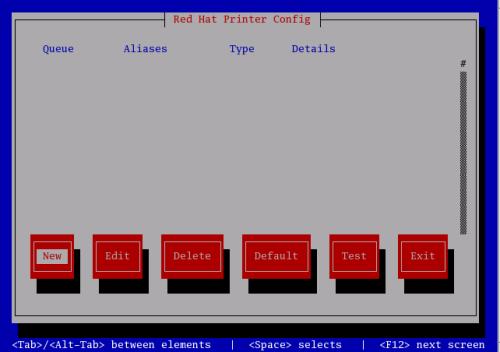
In
that case select [New]
please,
and continue with step Add
a new Print Queue.
|
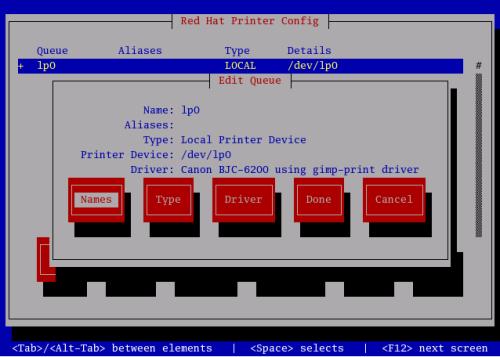
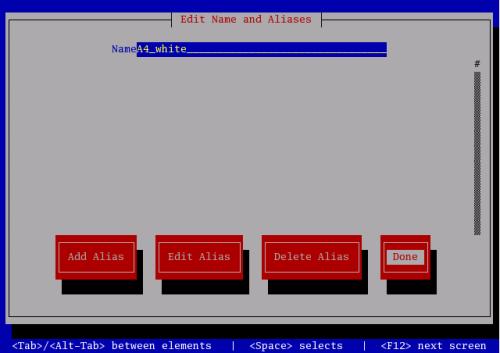
Rename
the Queue-Name
|
After
your choice of [Edit]
another
window opens.
There choose [Names],
please.
|
|
|
Within
this window you might change the Queue 'Name'. This name is shown
in lists to choose a printer when a print-job is started..
In
this example, the 'Name' was changed from
lp0
to
A4_white
.
By
choosing [Done]
the
window is closed again.
The window 'Edit Queue' is closed by
chosing [Done]
also.
Please
continuer with the step Review
Driver Options.
|
|
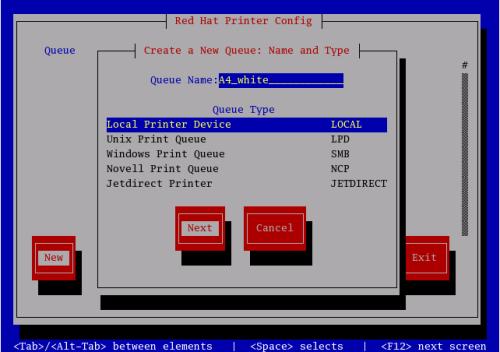
Add
a new Print Queue
|
If
[New]
was
chosen in the main window, this window will be shown.
This
window allows to set the 'Queue Name' (A4_white
was
chosen in this example) and the 'Queue Type'.
As the printer is
directly connected to the computer, 'Local Printer Device' is
selected as 'Queue Type'.
The
next step of the installation instruction is reached by chosing
[Next]
.
|
|
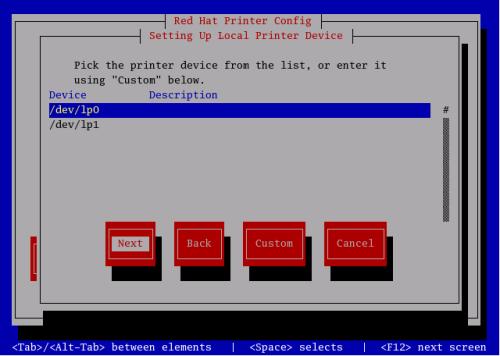
Configure
a Local Printer
|
Within
this step the choice, at which interface the printer is connected
has to be made.
The
			PC used for this example has 2 printer-interfaces of type
			'parallel' – which are shown for selection.
If the PC
			would have been equipped with an USB-connection, this choice would
			also have been listed.
After
chosing the correct interface, please click choose [Next]
to
			go to the next step.
|
|
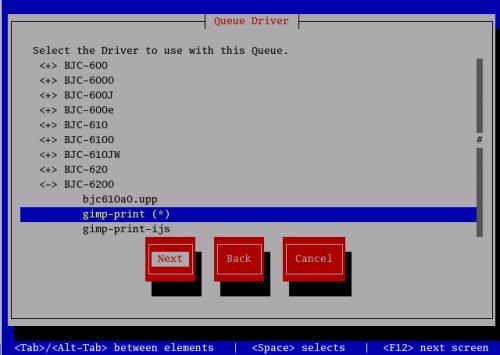
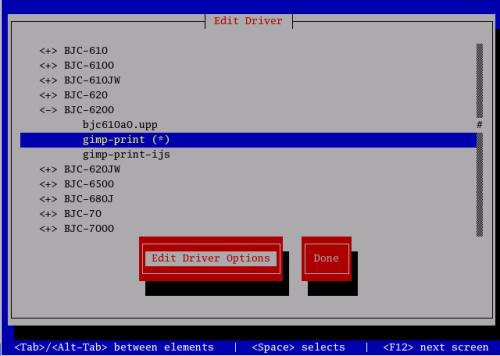
Select a
Print Driver
|
The
			driver for the attached printer is determined within this step.
For
this purpose, manufacturers are listed (not visible any more at
that example).
By selecting a manufacturer and typing the
Enter-key, all printer-models, where a driver is contained in the
installed Linux-package, are listed below the manufacturers
name.
With a further selcetion of the printer-model and typing
the Enter-Key again, all available drivers are listed.
The
recommended driver is marked by (*)
.
Possible
			pitfall:
Selecting
			just the printer-model is not sufficient; there has to be selected
			a driver too.
If
			your printer-model is not listed:
If
			you installed an older version of Linux (e.g. RedHat Version 8.0
			for the 'Router') it might occur that your newer printer-model is
			not listed.
That
			is not a problem as long as you do not want to start a printout
			from the PC the printer is connected to.
Either
			choose a predecessor-model of the same manufacturer
or select
			'Raw Print Queue' (at top of the list, before the manufacturers
			list start).
Control of the printer is then handed over to the
			workstation-PC that is accessing the printer.
If there a
			correct driver for the printer is installed (e.g. with a newer
			version of Linux or Windows), the printer receives correct
			preprocessed data.
The
final step of the installation will be reached by choosing [Next]
.
|
|
Finish
and Create the New Print Queue
|
Finally,
summary of the installation just carried out is shown.
The
window will be closed by choosing [Finish].
|
|
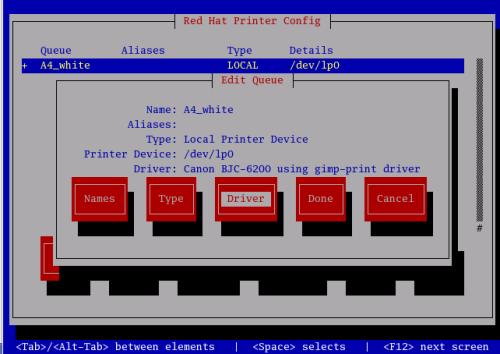
Review
Driver Options
|
To
change the Queue Name, the Printer-Model (and the associated
driver) and the parameters of the driver, select the printer in
the main window and the open the dedicated window by choosing
[Edit].
|
|
|
To
change the printer-model (and the driver) and the parameters of
the driver, choose [Driver]
and
the dedicated window will be appear.
|
|
|
The
installed driver is already marked.
Do not change this
selection if you do not want to change the driver !
By
selecting [Edit
Driver Options] a
window with the list of the driver-options is opend.
|
|
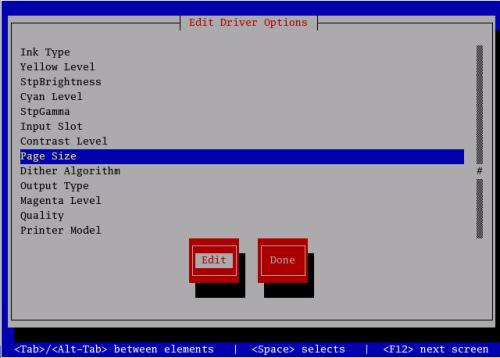
Review
Driver Options (Page Size, etc.)
|
The
			appearance depends highly on the configured printer-driver and
			might be highly different at your installed printer.
Usually,
			the values are set automatically.
It is recommended to review
			the following values:
Page
			Size
:
This value is set depending on the selected language (e.g.
'A4' for Deutsch (German), 'Letter' for English) and might
therefore be different from the paper used.
Ink
			Type
(print-heads):
This value is changeable if the print-heads of the printer can
be changed (e.g. 'Black Only', '4-Color', 'Photo').
A
window to change the value of an option will open after the option
is selected and [Edit]
is
chosen.
|
|
|
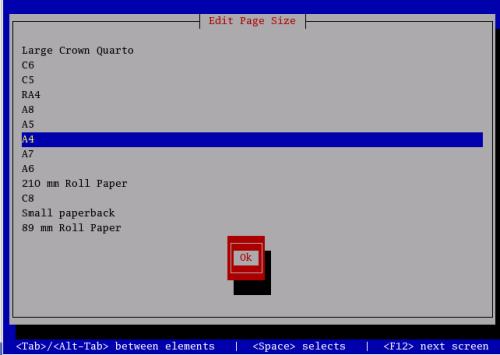
In
this example, Page
Size was
selected to be changed. At this window, the available page-sizes
are listed.
The
window will be closed by choosing [OK].
|
|
Store
(Activation) of changes made.
|
Opened
windows will be closed by choosing [Done].
Sometimes
			it is necessary, to close several windows to see the main-window
			with the list of installed printers again.
Changes
			made will be finally saved it
[Exit]
is
			chosen on the main-window.
After
			that, a window (no illustration shown) with a request to confirm
			the changes will be shown.
|
|
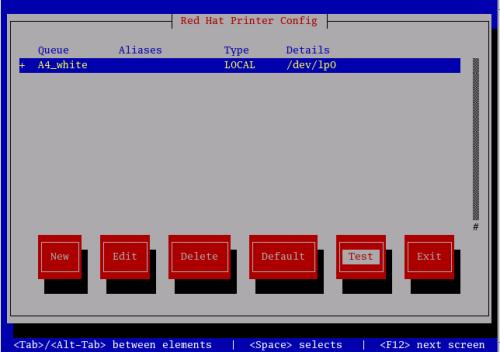
Testing
the Printer
|
The
			printout of a test-page is started by choosing
[Test]
on
			the main-window of the printer configuration.
Repetition: The
			printer-configuration is started with the command
system-config-printer
or
redhat-config-printer
respectively.
At
			the window shown, select the format of the page to be printed and
start the printout by choosing [Test].
|

|
▲ to
overview
SAMBA-Bugfix
in RedHat Linux Version 9
RedHat
Linux 9 (maybe other versions too) was delivered with an error
preventing, that a printer, which was made accessible to other
workstations within the internal network using SAMBA, will print jobs
sent to it.
This error may confuse users, as the printer is listed
as 'ready', accepts print-jobs – but does not print them out.
Thanks
for preliminary work to:
An
excellent documentation and solution of the problem can be found
under
http://www.wlug.org.nz/SambaPrinting.
A
big Thank You to the anonymous authors.
Prerequisites
Installation
Instruction
Open
the file
/etc/samba/smb.conf
and
identify the description for the installed printer.
The following
example is for an installed HP-Deskjet-340 and named
HPDJ-340
(therefore
identified with [HPDJ-340]).
For
your installation, the identifier will be different – for sure.
Add
the commands printed in bold:
[HPDJ-340]
comment
= portable printer
path = /var/spool/samba
read only =
No
printable = Yes
printer name = HPDJ-340
oplocks =
No
print
command = lpr -P %p -o raw %s -r
lpq command = lpstat -o %p
lprm
command = cancel %p-%j
Test
'Install'
the printer on a workstation with windows and print a Test-Page.
▲ to
overview