Right
	click onto the project JS_Struts00 and select >Copy.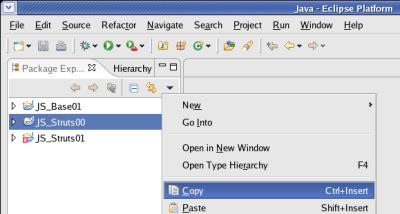
Right
	click onto any project or the white space on the 'Package Explorer'
	window and select >Paste.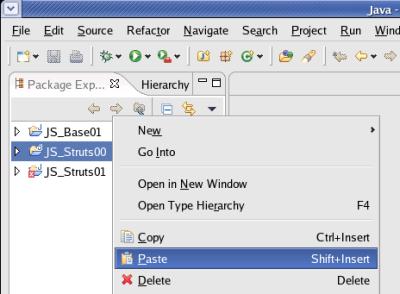
|
Last
revision of this document: |
This
document describes the creation of a JSP-file (JSP – Java
Server Page) with integrated functionality to display time and
TCP/IP_address of the caller.
This lesson is using the
Struts-framework (see JS_Struts00) under Eclipse,
packing the JSP-files into a WAR, defining parameters in the
'application.xml'-file, packing the files into one EAR (Enterprise
Archive) file and deploying the EAR-file to
JBoss-Java-Application-Server.
In the 'application.xml'-file is another 'context-root' defined. This allows to call the site under another name than the name of the WAR- or EAR-file.
Credits:I
derived that lesson from a lot of sources found in the internet. I
thank the numerous authors for their contribution.
JS_Struts01 – HTML in a WAR completed – and its prerequisites too.
Basic knowledge of Java programming language; particular the usage of libraries.
Recommended:
JS_Base01
- HelloWorld completed
– if you are a newbie with Eclipse.
Preparation:Create
a new project (named JS_Struts02)
by copying the Struts-framework (JS_Struts00):
Right
click onto the project JS_Struts00 and select >Copy.
Right
click onto any project or the white space on the 'Package Explorer'
window and select >Paste.
Replace
	the 'Project name' from the default value (Copy of JS_Struts00) to
	the new name (JS_Struts02)
	and press the [ OK ] button thereafter.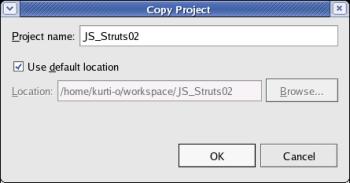
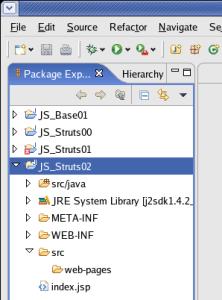
In
the 'Package Explorer' window you should see a new project with the
name 'JS_Struts02' with the following structure.
(You can
expand/collapse the structure by clicking onto the triangles left of
the folders.)
Writing
the JSP-code:
Write
the start-page (index.jsp) – which will be the only page in
this lesson.
Right
	click onto the folder 'web-pages' and select >New>File.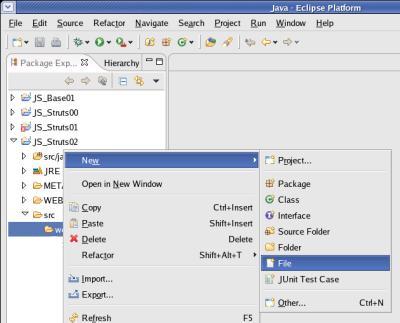
Enter
	the 'File name' (index.jsp)
	and press the [ Finish ] button thereafter.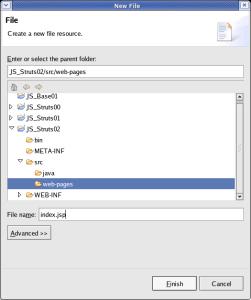
Aim
of this lesson is mainly to write a JSP-file an create an EAR; so the
JSP- and HTML-code is kept pretty simple.
There is one 'index.jsp'
file which displays the current date/time and the TCP/IP-address of
the caller.
Eclipse
has already opened the file for edit and the code can be
entered.
<%@
page language=“java“
%>
<%@ page import=“java.util.*,
java.text.*“
%>
<head>
<title>JavaScout
Struts-Tutorial lesson 02
</head>
<body><h1>Welcome
at lesson 2 of the JavaScout Struts-Tutorial !
<br>This
is the <i></i>
<br>The
current time is:<%Date
now = new
Date();
out.println(DateFormat.getTimeInstance().format(now));%><br><br>Thank
you for calling this Java-Server-Page ! <br>
<br>
<fontcolor=“green“>This
page was called from the machine with TCP/IP-address
<B<%out.println(request.getRemoteAddr());%></B>
</font>
</body>
</html>The
entered text can be saved by clicking the right mouse-button and
selecting
Save
A
short explanation of the newly introduced elements in the code.
These
elements are interpreted by the Java-Application-Server as soon as
the web-page is called.
<%@
page language=“java“
%>Directive
to use the Java programming language for all code embraced by <%
and %>.
<%@
	page import=“java.util.*,
	java.text.*“ %>

Import
	the listed libraries; they are used by Java-code later.
<%Date
now = new
Date();
out.println(DateFormat.getTimeInstance().format(now));
%>
Define
a variable named
'now' of type 'Date' and get the actual
date/time.
Convert the time part into a text-string and insert
(print) it at the actual position within the HTML-code.
<%out.println(request.getRemoteAddr());%>
Get
	the TCP/IP-address of the caller for this web-site and insert
	(print) it at the actual position within the HTML-code.
Making
the packaging configuration and pack the HTML-files into a WAR
(Web-ARchive):
This
is an intermediate step in this lesson as the final aim is an EAR
(Enterprise Archive) file.
The WAR-file can be deployed to the
Java-Application-Server for an intermediate test.
Define,
which files are packed into the WAR – in this lesson it is only
one.
Right
	click onto the project 'JS_Struts02' and select >Properties.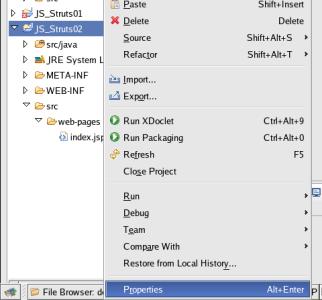
In
	the left window select 'Packaging Configurations'.
Click
	the [ Add... ]-button.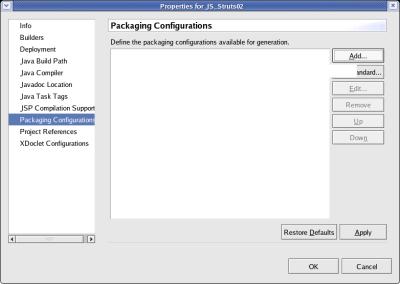
Enter
	the name of the destination-file (JS_Struts02.war)
	into the field 'Name' and click the [ OK ]-button.
Right
	click onto the displayed file (JS_Struts02.war) and select >Add
	Folder... .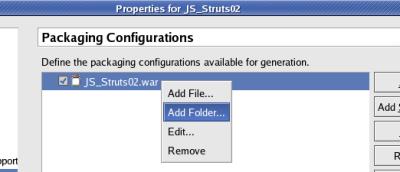
On
	the 'Folder Selection'-window click the [Project
	Folder...]-button.
On the
	'Select a Folder'-window select the folder 'web-pages' of the
	project 'JS_Struts02' and click
	the [ OK ]-button.
The
	'Select a Folder'-window closes and the folder-name is transfered to
	the input field 'Folder' of the 'Folder Selection'-window.
To
	finish, click the [ OK ]-button
	on the
	'Folder-Selection'-window.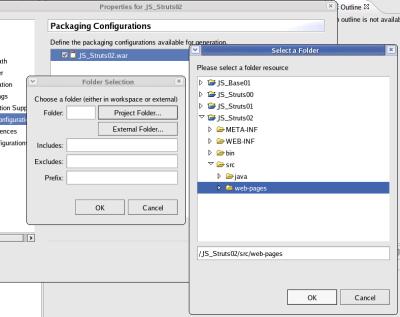
Note:
	The purpose of the other input-fields on the 'Folder
	Selection'-window is explained in further lessons.
The outcome of
	the selection is, that the (to be generated) WAR-file contains all
	files of the folder 'web-pages' with the structure of the
	sub-folders kept intact.
To
	verify, that the files of the selected folder and its sub-folders is
	in the Packaging Configuration, the 'Properties'-window looks like
	follows.
To generate a file with the data to be packaged, click
	the
	[
	OK ]-button.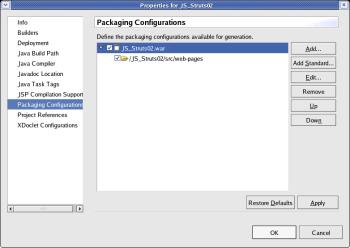
To
	start the packaging process, right-click onto the project
	(JS_Struts02) and select >Run
	Packaging .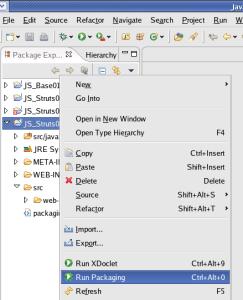
The
build-process can be watched in the 'console'-window. 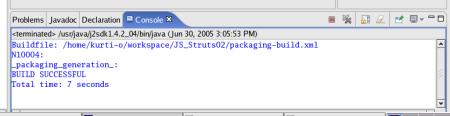
top.
Intermediate
Run / Test:
Before
the lesson continues with packaging into an EAR-file, it is advisible
to verify, if the WAR-file with the 'index.jsp'-file is error
free.
The simpliest check is, to deploy the WAR-file to the
Java-Application-Server.
For the conceptional background of deployment to a Java-Application-Server and the assumptions of the directories with the Eclipse-workspace and and the Java-Application-Server-deployment, please see Run / Test in JS_Struts01 – HTML in a WAR .
To
deploy the WAR-file, open a 'Terminal'-window and enter the
following command:
cp
/home/kurti-o/workspace/JS_Struts02/JS_Struts02.war /opt/jboss/server/default/deploy![]()
If
the
JBoss-Application-Server
was started in a
'Terminal'-window (which is recommended for this lesson) and
messages are displayed, JBoss displays a message similar to this:
.
The
result of lesson 1 can be seen on a web-browser.
Enter the
following URL: http://192.168.0.62:8080/JS_Struts02
(In
the example, th running on a machine
with the TCP/IP-address '192.168.0.62'.)e
JBoss-Application-Server
is
and you can
see the result: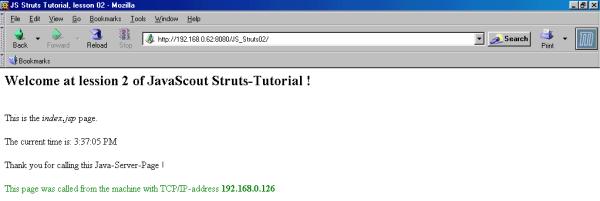
Note:
There
is also a functionality in Eclipse to define the
Java-Application-Server and deploy and undeploy with an
Eclipse-function.
I was not pretty happy with that feature. My
JBoss-Application-Server
is
So I prefer to stay on the more secure side and copy
the files using the 'Terminal'-window.
Defining
of the 'application.xml'-file as a prerequisite for an EAR
(Enterprise-ARchive):
As
the project should be registered under another name (strutslesson02)
than the name of the WAR-file (JS_Struts02.war), it is necessary to
find out which parameter-file is responsible for that.
As the
concept of the WAR does not know a different registration-name, the
WAR-file (and the parameter-file(s)) is packed into an EAR
(Enterprise-ARchive) file.
In one of the following lessons is also
shown, that the EAR can contain other parameter-files, e.g.
references to a database.
Define
the (different) registration name (strutslesson02)
under which the web-site will be registered in the
Java-Application-Server.
This parameter is set.
Expand
	the project-structure to see the content of the folder
	'META-INF'.
Right click onto the folder 'META-INF' and select
	>New>File.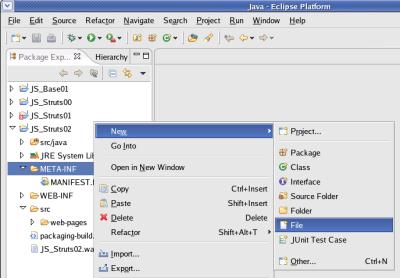
Enter
	the 'File name' (application.xml) and click the [ Finish
	]-button.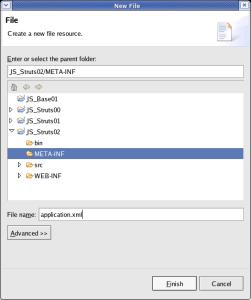
Eclipse
has already opened the file for edit and the parameters can be
entered.
<!DOCTYPE application PUBLIC “-//Sun Microsystems, Inc.//DTD J2EE Application 1.3//EN“ “http://java.sun.com/dtd/application_1_3.dtd“>
<application>
<display-name>JavaScout
Struts-Tutorial, lesson
02</display-name> <module> <web>
JS_Struts02.war</web-uri> <context-root>strutslesson02</context-root
> </module>>The
entered text can be saved by clicking the right mouse-button and
selecting Save
from
the context menu.
A
short explanation of the elements in the parameters.
These
elements are interpreted by the Java-Application-Server as soon as
the web-page is called.
<?xml
version=“1.0“
encoding=“UTF-8“?>Directive,
which character-set is used and according to which version of the
J2EE-specification the parameters have to be interpreted.
<!DOCTYPE application PUBLIC “-//Sun Microsystems, Inc.//DTD J2EE Application 1.3//EN “http://java.sun.com/dtd/application_1_3.dtd“>
<display-name>
JavaScout
Struts-Tutorial, lesson 02</display-name>
Full
name of the element, this is displayed in the list of deployed
elements in the Java-Application-Server.
<web-uri>
JS_Struts02.war</web-uri>
File
containing the HTML-files building the web-site.
Full
name of the element, this is displayed in the list of deployed
elements in the Java-Application-Server.
<context-root>
strutslesson02</context-root
>
Short-name,
under which the EAR is registered within the Java-Application-Server
and under which it can be called from a web-browser.
Making
the packaging configuration and pack the files into an EAR
(Enterprise-ARchive):
This
is the final packaging-configuration.
Pack
the WAR-file and the 'application.xml' parameter-file into the
EAR-file..
Right
	click onto the project 'JS_Struts02' and select >Properties.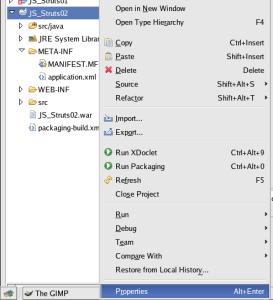
In
	the left window select 'Packaging Configurations'.
Click
	the [ Add... ]-button.
Enter
	the name of the destination-file (JS_Struts02.ear)
	into the field 'Name' and click the [ OK ]-button.
Right
	click onto the displayed file (JS_Struts02.war) and select >Add
	File... .
On
	the 'File Selection'-window click the [Project
	File...]-button.
On the
	'Select a File'-window select the file'JS_Struts02.war' of the
	project 'JS_Struts02' and click
	the [ OK ]-button.
The
	'Select a File'-window closes and the file-name is transfered to the
	input field 'File' of the 'File Selection'-window.
To
	finish, click the [ OK ]-button
	on the
	'File-Selection'-window.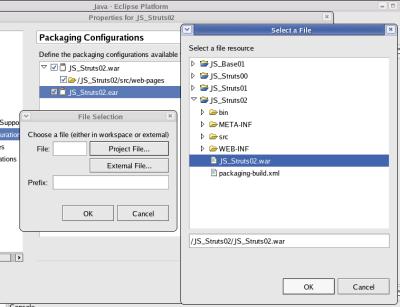
Do
	the 'Add File...' part again.
On
	the 'File Selection'-window click the [Project
	File...]-button again.
On the
	'Select a File'-window select the file'application.xml' of the
	folder 'META-INF' and click
	the [
	OK ]-button.
The
'Select a File'-window closes and the file-name is transfered to the
input field 'File' of the 'File Selection'-window.On
the field 'Prefix' enter the value 'META-INF'
To
finish, click the the
'File-Selection'-window.[
OK ]-button
on 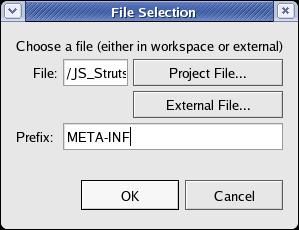
The
'Prefix' ('META-INF') directs the following builder to put the file
'application.xml' into a folder 'META-INF' within the packed file
'JS_Struts02.ear':
When the EAR-file is deployed, the
Java-Application-Server looks unter thze 'META-INF' folder for
deployment directives.
To
	verify, that the files of the selected folder and its sub-folders is
	in the Packaging Configuration, the 'Properties'-window looks like
	follows.
To generate a file with the data to be packaged, click
	the
	[
	OK ]-button.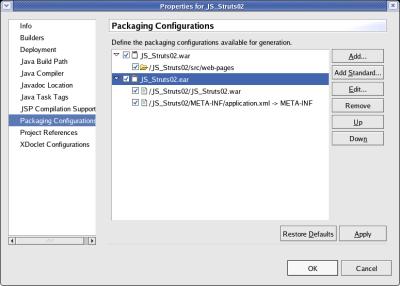
To
	start the packaging process, right-click onto the project
	(JS_Struts02) and select >Run
	Packaging .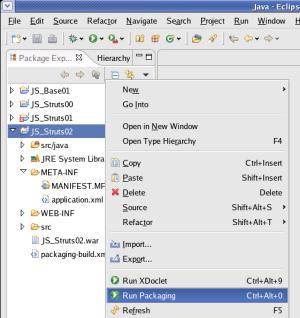
The
build-process can be watched in the 'console'-window. 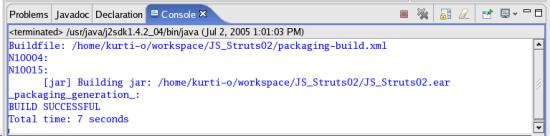
top.
Run
/ Test:
This is the final verification if the generated 'JS_Struts02.ear' file (with an Enterprise ARchive structure) is running error-free within a Java-Application-Server.
For the conceptional background of deployment to a Java-Application-Server and the assumptions of the directories with the Eclipse-workspace and and the Java-Application-Server-deployment, please see Run / Test in JS_Struts01 – HTML in a WAR .
To
deploy the EAR-file, open a 'Terminal'-window and enter the
following command:
cp
/home/kurti-o/workspace/JS_Struts02/JS_Struts02.ear /opt/jboss/server/default/deploy
If
the JBoss-Application-Server
was
started in a 'Terminal'-window (which is recommended for this
lesson) and messages are displayed, JBoss displays a message similar
to this: .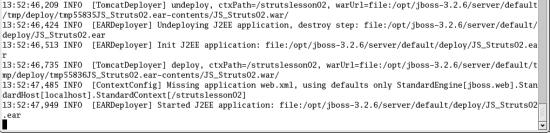
The
result of lesson 2 can be seen on a web-browser.
Enter the
following URL: http://192.168.0.62:8080/strutslesson02
(In
the example, th running on a machine
with the TCP/IP-address '192.168.0.62'.)e
JBoss-Application-Server
is
and you can
see: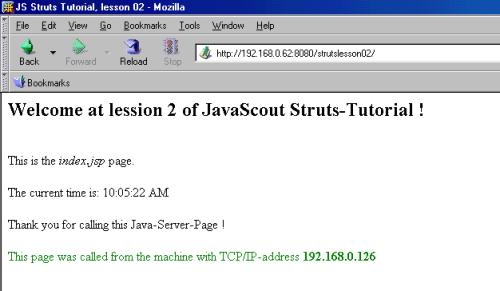
Note:
There
is also a functionality in Eclipse to define the
Java-Application-Server and deploy and undeploy with an
Eclipse-function.
I was not pretty happy with that feature. My
JBoss-Application-Server
is
So I prefer to stay on the more secure side and copy
the files using the 'Terminal'-window.
Related
Documents: