Right
	click onto the project JS_Struts00 and select >Copy.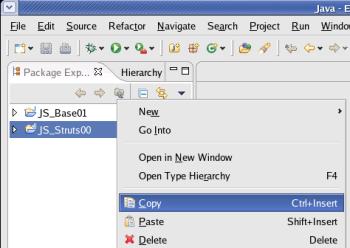
Right
	click onto any project or the white space on the 'Package Explorer'
	window and select >Paste.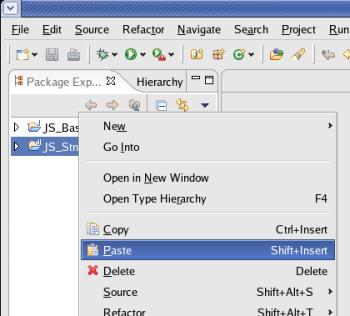
|
Last
revision of this document: |
This document describes the creation of 3 HTML-files in different sub-directories using the Struts-framework (see JS_Struts00) under Eclipse, packing them into a WAR and deploying the WAR-file to JBoss-Java-Application-Server.
Credits:I
derived that lesson from a lot of sources found in the internet. I
thank the numerous authors for their contribution.
Eclipse installed - and all its prerequisites too ;-).
JBoss-IDE plugin installed.
Struts-framework
(JS_Struts00) set up and
Create
separate directories for the source-code set up.
JBoss-Java-Application-Server installed - and all its prerequisites too ;-).
Recommended:
JS_Base01
- HelloWorld completed
– if you are a newbie with Eclipse.
Preparation:Create
a new project (named JS_Struts01)
by copying the Struts-framework (JS_Struts00):
Right
click onto the project JS_Struts00 and select >Copy.
Right
click onto any project or the white space on the 'Package Explorer'
window and select >Paste.
Replace
	the 'Project name' from the default value (Copy of JS_Struts00) to
	the new name (JS_Struts01)
	and press the [ OK ] button thereafter.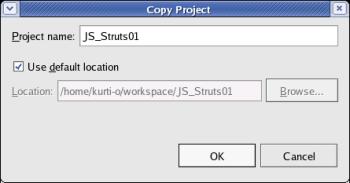
In
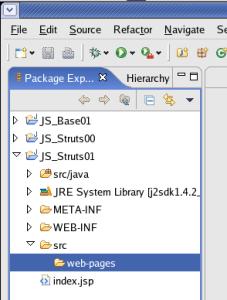
the 'Package Explorer' window you should see a new project with the
name 'JS_Struts01' with the following structure.
(You can
expand/collapse the structure by clicking onto the triangles left of
the folders.)
Create
the subdirectories:
Right
	click onto the folder 'web-pages' and select >New>Folder.
Right
	click onto the folder 'web-pages' and select >New>Folder.
Enter
	the 'Folder name' (sub_directory_1)
	and press the [ Finish ] button thereafter.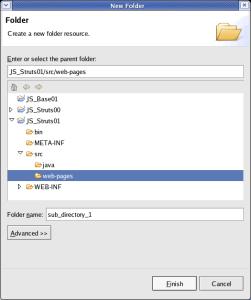
Repeat
	the previous step for a 'Folder name' of sub_directory_2.
top.
Writing
the HTML-code:
Write
the start-page (index.html).
Right
	click onto the folder 'web-pages' and select >New>File.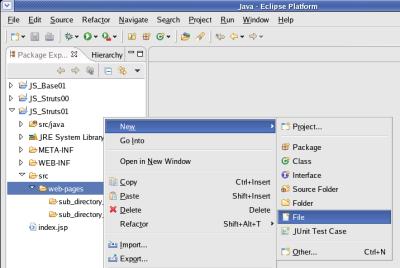
Enter
	the 'File name' (index.html)
	and press the [ Finish ] button thereafter.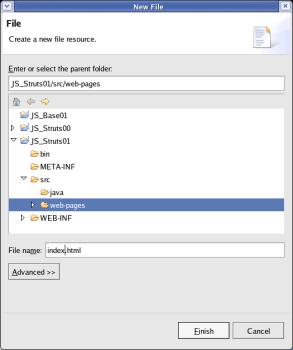
Aim
of this lesson is mainly to pack HTML-files into a WAR; so the
HTML-code is kept pretty simple.
There is one 'index.html' file
which has a little bit of text and 2 links to HTML-files in different
sub-directories.
Eclipse
has already opened the file for edit and the code can be
entered.<html>
<head><title>JavaScout
Struts-Tutorial lesson 1</title></head>
<body><h1>Welcome
at lesson 1 of the JavaScout Struts-Tutorial !</h1>
<br>This
is the <br><i>index.html</i>
page.
<br><a>
href=“sub_directory_1/sub_page_1.html“>Link
to page in sub-directory 1
<br><a>
href=“sub_directory_2/sub_page_2.html“>Link
to page in sub-directory 2</a>The
entered text can be saved by clicking the right mouse-button and
selecting Save
from the
context menu.
Write
the sub-pages (sub_page_1.html and sub_page_2.html).
Right
	click onto the folder 'sub_directory_1' and select >New>File.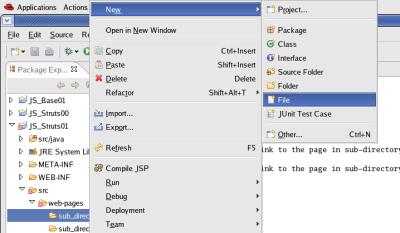
Enter
	the 'File name' (sub_page_1.html)
	and press the [ Finish ] button thereafter.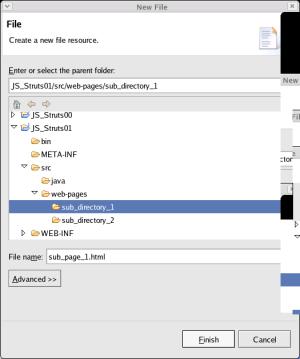
Repeat
the two previous steps for the
'sub_directory_2'
and create a file .
sub_page_2.html
Eclipse
has already opened the files for edit.<html>
The code for
sub_page_1.html
<head><title>JavaScout
Struts-Tutorial lesson 1</title></head>
<body><h1>Welcome
at lesson 1 of the JavaScout Struts-Tutorial !</h1>
<br>This
is the <br><i>sub_page_1.html</i>
page in sub_directory_1.
<br>
Please
use the 'Back'-button of your browser to return to the
index-page.The
code for sub_page_2.html
<html>
<head><title>JavaScout
Struts-Tutorial lesson 1</title></head>
<body><h1>Welcome
at lesson 1 of the JavaScout Struts-Tutorial !</h1>
<br>This
is the <br><i>sub_page_2.html</i>
page in sub_directory_2.
<br>Please
use the 'Back'-button of your browser to return to the
index-page.The
entered text can be saved by clicking the right mouse-button and
selecting Save
from the
context menu.
Hint:
Eclipse shows all HTML-files in error. These are false errors due to
misinterprtation of the <br>
tag
top.
Making
the packaging configuration and pack the HTML-files into a WAR
(Web-ARchive):
The
advantage of a WAR-file is, that a complete project can be transfered
to a Web-Appliocation-Server.
This minimizes the danger of missing
files for the transfer and have an incomplete or inconsistant Site
presented.
Define,
which files are packed into the WAR.
Right
	click onto the project 'JS_Struts01' and select >Properties.
In
	the left window select 'Packaging Configurations'.
Click
	the [ Add... ]-button.
Enter
	the name of the destination-file (JS_Struts01.war)
	into the field 'Name' and click the [ OK ]-button.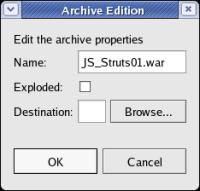
Right
	click onto the displayed file (JS_Struts01.war) and select >Add
	Folder... .
On
the 'Folder Selection'-window click the [Project
Folder...]-button.
On the 'Select a Folder'-window select the
folder 'web-pages' of the project 'JS_Struts01' and click
the [ OK ]-button.
The 'Select a
Folder'-window closes and the folder-name is transfered to the input
field 'Folder' of the 'Select a Folder'-window.Co
finisch, click the [
OK ]-button on the
'Select a Folder'-window.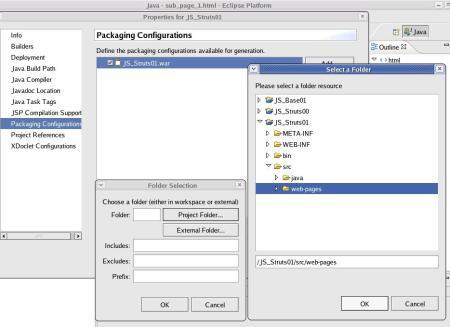
Note:
	The purpose of the other input-fields on the 'Folder
	Selection'-window is explained in further lessons.
The outcome of
	the selection is, that the (to be generated) WAR-file contains all
	files of the folder 'web-pages' with the structure of the
	sub-folders kept intact.
To
	verify, that the files of the selected folder and its sub-folders is
	in the Packaging Configuration, the 'Properties'-window looks like
	follows.
To generate a file with the data to be packaged, click
	the
	[
	OK ]-button.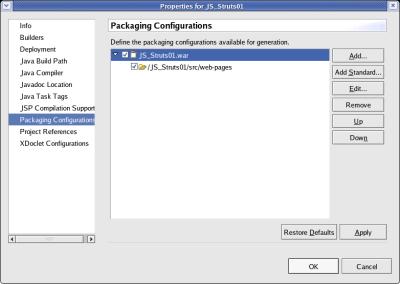
To
	start the packaging process, right-click onto the project
	(JS_Struts01) and select >Run
	Packaging .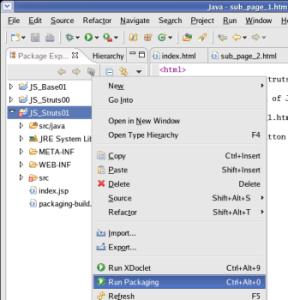
The
build-process can be watched in the 'console'-window. 
top.
Run
/ Test:
The
generated file (JS_Struts01.war) is now visible in the 'Package
Explorer'-window.. 
The
gerated WAR-file has to be deployed to the
Java-Application-Server.
*For the JBoss-Application-Server
this
is done by copying the generated WAR-file (JS_Struts01.war) to the
deployment directory of the
JBoss-Application-Server
.
The directory, where the generated WAR-file is stored can be
found as follows:
The directory for the Eclipse-Workspace
can be selected during the Eclipse-startup.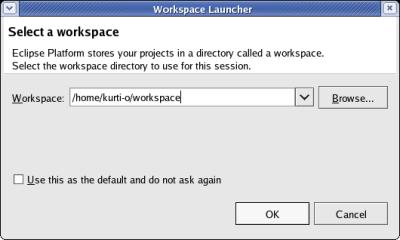
The
subdirectory for the project within the workspace has the name of
the project.
In our case this would be
/home/kurti-o/workspace/JS_Struts01
.
If
the standard-installation of the
JBoss-Application-Server
was
done, the target
directory of the WAR-file is
/opt/jboss/server/default/deployTo
deploy the WAR-file, open a 'Terminal'-window and enter the
following command:
cp
/home/kurti-o/workspace/JS_Struts01/JS_Struts01.war /opt/jboss/server/default/deploy![]()
If
the
JBoss-Application-Server
was
started in a
'Terminal'-window (which is recommended for this lesson) and
messages are displayed, JBoss displays a message similar to this:
.
The
result of lesson 1 can be seen on a web-browser.
Enter the
following URL: http://192.168.0.62:8080/JS_Struts01
(In
the example, th running on a machine
with the TCP/IP-address '192.168.0.62'.)e
JBoss-Application-Server
is
and you can
see the result:
Please
try to manouvre to the sub-pages and view the Page-Source !
Note:
There is also
a functionality in Eclipse to define the Java-Application-Server and
deploy and undeploy with an Eclipse-function.
I was not pretty
happy with that feature. My
JBoss-Application-Server
is
So i stayed on the more secure side and copy the
files using the 'Terminal'-window.
Related
Documents: