Select
>File>New>Project.
|
Last
revision of this document: |
This
step of the tutorial deals with the set-up of a project in Eclipse
and the design of the GUI (Graphic User Interface).
Preface:The
code written in this tutorial is far away from being
optimized.
Emphasis of this tutorial is to develop the application
in small steps where the completion of each step allows the
application to be run eror-free and showing the result aimed by the
step.
Therefore the code is written to be understandable in favor
of being optimized.
Credits:A
reference of the elements for the GUI in JAVA can be found under
http://java.sun.com/docs/books/tutorial/uiswing/layout/gridbag.html
.
JS_Base01 – HelloWorld, developed using Eclipse completed – and its prerequisites too.
VE (Visual Editor for Eclipse) installed to see the GUI while coding.
Basic knowledge of Java programming language; particular the usage of libraries.
Preparation:Create
a new project (named JS_Base02)
in Eclipse:
Select
	>File>New>Project.
In
	the New Project window select >Java Project and
	press the [Next >] button thereafter.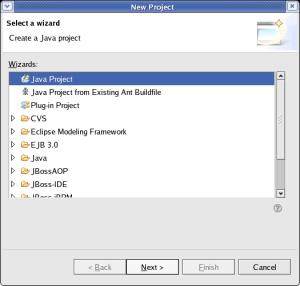
Enter
	the Project Name (JS_Base02),

select 'Create
	separate source and output folders',
leave all other values
	unchanged and press
	the [Next >] button thereafter.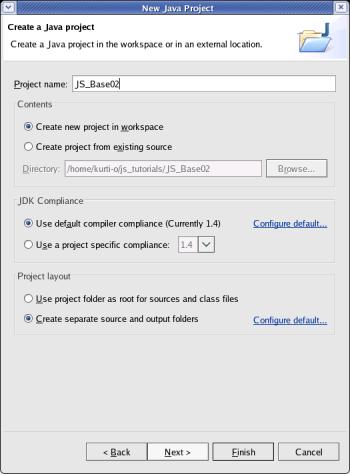
Change
	the 'Default output folder' to JS_Base02/gen/classes,

select the 'src' folder
and then click the Remove
	source folder 'src' from build path text.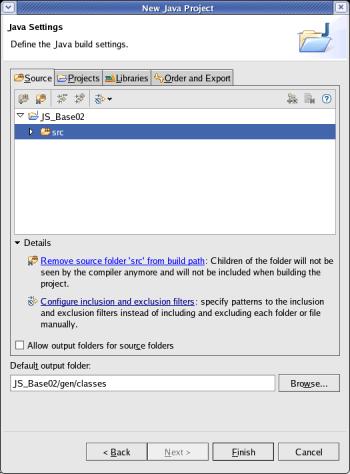
Click
the
to create the
project.[
Finish ] button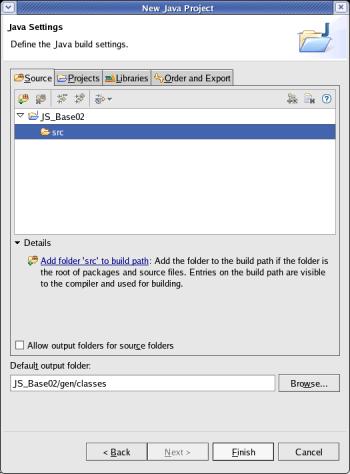
To
	define a new source-folder (where the java code resides)
select
	the project 'JS_Base02' and click the right mouse-button.
Then
	select 'Properties'.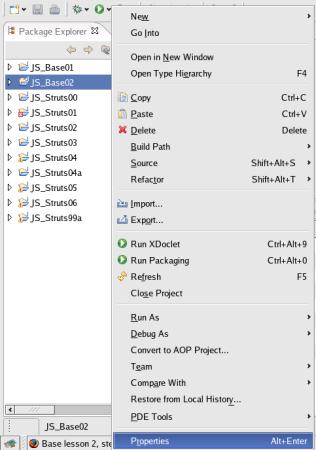
Select
	'Java Build Path', then the tab 'Source' and click
	the [
	Add Folder... ] button.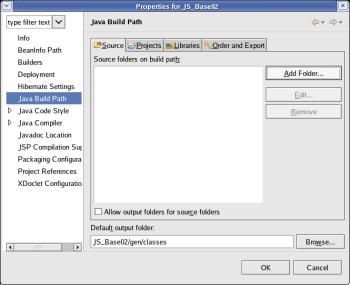
Select
'src' and click the :.[
Create New Folder... ] button.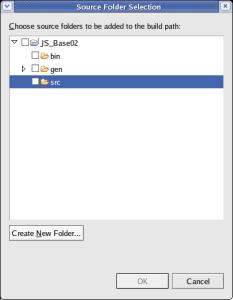
Enter
	'java' (the name of the new folder) and click the [
	OK ] button: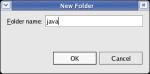
Check
	that the new folder was accepted and click the [
	OK ] button: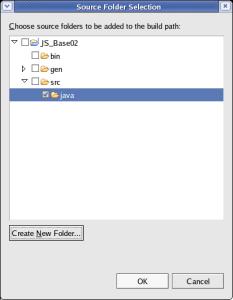
Click
	the [
	OK ] button to close the 'Properties' window: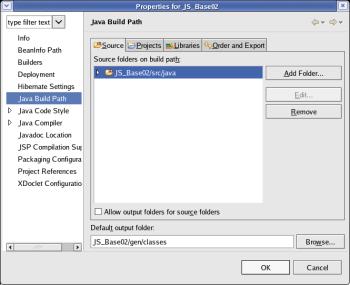
Create
and code the Class for the GUI:
The
code responsible for the GUI-part is the class we start with.
N.B.:
1.) To separate the code for actions and for handling events
(explanation follows later) two more classes are created later.
2.)
The Visual Editor offers several templates for GUI-Styles. To explain
the creation of each GUI-element this element is developed 'from
scratch' without selecting a template.
Right
	click onto the project 'JS_Base02' and select >New>Other...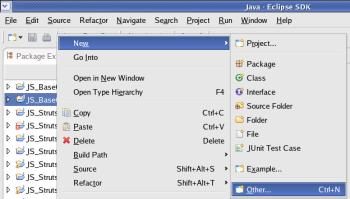
In
	the following window expand 'Java' (if not alredy done), select
	>Visual Class and
	click the [Next >] button.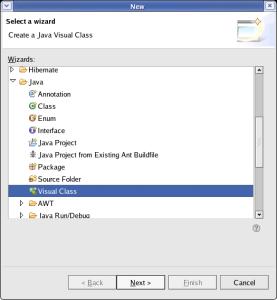
Enter
	the Package (js_base02.application),
	the (Class-)Name (JS_DBLoad)
	and from
	the Style scrollbox select
	>Others>Object.

Check [ ]
	public static void main(String[] args) and click the [Finish]
	button.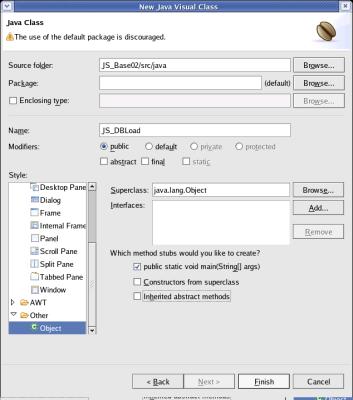
Eclipse
	has already generated a template and the individual code can be
	entered.
In
the following explanations all new code is written in bold
letters.
Code generated by the template or entered in previous
steps (old code) is in italics.
Larger blocks of old code may be
skipped.
The
class inherits frome JFrame; so this class has to be imported and
the 'extension' of it has to be incorporated.
Additionally a
comment is added.package
js_base02.application;
javax.swing.*;
/***
* @author kurt@javascout.biz
*
@date 2006-02-10
*
* @description
*
* - create a GUI using javax.swing components
*
- load parameters for DB-connection from a XML-file
* -
connect to a database
* - read SQL-commands from a
text-file and perform them
*
@change-log
* when who why
*
--------------------------------------------------------
*
*/public
class JS_DBLoad
extends
JFrame{
//*
*
@param args
*/
public
static void main(String[]
args) {
}The
entered text can be saved by clicking the right mouse-button and
selecting
Save
from the
context menu.
As
next step, a constructor-method is implemented.
This
'constructor' initializes an object and calls an initialization
method.
The constructor-method is called from the
main-method.
The
initialization method then sets the size and the Title-text of the
application.public
class JS_DBLoad
extends
public
JS_DBLoad(){
super
initialize();
}
private
void
setVisible(true
setSize(600,
700);
setTitle(„JavaScout-Tutorial
– Base02 – DBLoad“);
}
public
static void main(String[]
args) { try
JS_DBLoad
aJS_DBLoad = new
aJS_DBLoad.setVisible(true
} catch
System.out.println(„Exception
occured in main() of
JS_DBLoad“);
exc.printStackTrace(System.out);
} }
Please
	remind to save the code just typed.
Now
it is time to run the code already implemented.Select
>Run>Run
As>Java Application.
If
	the code was error-free the application starts and shows the (till
	now empty) frame with the text in the title-bar.
As
the first step is mastered, the next one will be to define all
elements and build the complete GUI with those elements.
Start is
with defining the elements; the explanation of the purpose and the
function follows later.public
class JS_DBLoad extends
JFrame{ private
JPanel pnl_Main=null; private
JButton btn_Select=null; private
JButton
btn_Start=null; private
JButton
btn_Print=null; private
JTextField txt_InputFile=null; private
JScrollPane scroll_Report=null; private
JTextrArea txt_Report=null; public
JS_DBLoad(){
As
there are some methods of the AWT-package (Abstract Windows Toolkit
- the base functions for JAVA-GUIs) requiered, the package has to be
imported.package
js_base02.application;import
java.awt.*;import
javax.swing.*;
To
see a result soon and to get feedback if the coding is correct, now
only the button 'Select' is coded and placed onto the 'Main'-panel
in the next step.
For an explanation of the properties please see
tutorials alredy available from other sources.
A good starting
point is to search Google with e.g. 'tutorial JButton' or 'tutorial
JPanel' respectively. public
JS_DBLoad(){
super();
initialize();
}
private
JButton get_btn_Select() {/*
The code of this method auto-creates the element if it is not
already defined */ if
(btn_Select
== null) {
try
{
btn_Select
= new
JButton(); btn_Select.setName( }“btn_Select“); btn_Select.setToolTipText(“Select
Input-File containing
SQL-commands“); btn_Select.setMargin(new
Insets(3,3,3,3)); btn_Select.setVerticalTextPosition(SwingConstants.CENTER); btn_Select.setHorizontalTextPosition(SwingConstants.CENTER); btn_Select.setText(“Select
Input-File“); catch
(Throwable Exc) { }
System.out.println(“Error
while building
btn_Select“);
Exc.printStackTrace();
}
return
btn_Select;
}
private
JPanel get_pnl_Main() {
/* The code
of this method auto-creates the element if it is not already defined
*/
if
(pnl_Main
== null) {
try
{
pnl_Main
= new
JPanel(); }pnl_Main“);pnl_Main pnl_Mainnew);
GridBagLayout()/*
Define GridBagConstraints for the Button to be added
*/ GridBagConstraints
gbc_btn_Select = new;
GridBagConstraints() gbc_btn_Select.gridx
= 0; gbc_btn_Select.gridy
= 0; gbc_btn_Select.fill
=
GridBagConstraints.HORIZONTAL; gbc_btn_Select.weightx
= 1; gbc_btn_Select.anchor
= GridBagConstraints.LINE_END;/*
Add the Button to the Panel; Button-position is controlled by
GridBagConstraints */ get_pnl_Main().add(get_btn_Select(),
gbc_btn_Select) catch
(Throwable Exc) { }
System.out.println(“Error
while building
pnl_Main“);
Exc.printStackTrace();
}
return
pnl_Main;
}
private
void initialize() {
Finally,
	the just coded 'Panel' must be defined as 'ContentPane' of the
	application.

    private
	void initialize()
	{
      setVisible(true);
      setSize(600,
	700);
      setTitle(„JavaScout-Tutorial
	– Base02 –
	DBLoad“);
      setContentPane(get_pnl_Main());
    }
Please
	remind to save the code just typed.
To
	see the result of the just typed code, run the application again by
	selecting >Run>Run
	As>Java Application.
The
	application should look like this containing the button.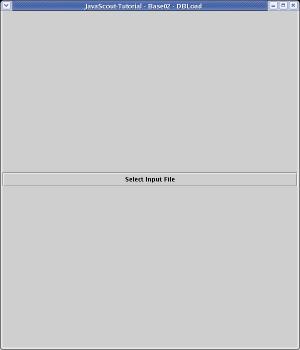
As
a next step the other two buttons and the text-field for displaying
the directory and file-name of the input-file (with the
SQL-commands) is coded and added to the panel.
To avoid a too
long and boring code-work before the next result is visible, the
coding of the scrollable text-area follows in the step
after. }
return
btn_Select;
}
private
JTextField get_txt_InputFile {
/*
The code of this method auto-creates the element if it is not
already defined */
if
(txt_InputFile
== null) {
try
{
txt_InputFile
= new
JTextField(); }txt_InputFile.setName(“);txt_InputFile“ txt_InputFile.setToolTipText(“Selected
Input-File containing
SQL-commands“); txt_InputFile.setMargin(new
Insets(3,3,3,3)); catch
(Throwable Exc) { }
System.out.println(“Error
while building
txt_InputFile“);
Exc.printStackTrace();
}
return
txt_InputFile;
}
private
JButton get_btn_Start {
/*
The code of this method auto-creates the element if it is not
already defined */ if
(btn_Start
== null) {
try
{
btn_Start
= new
JButton(); btn }_.setName(Start“btn_);Start“ btn_.setToolTipText(Start“Start
SQL-commands against the
DataBase“); btn_.setMargin(new
Insets(3,3,3,3));Start btn_.setVerticalTextPosition(SwingConstants.StartCENTER); btn_.setHorizontalTextPosition(SwingConstants.StartCENTER); btn_.setText(Start“Start
SQL execution“); catch
(Throwable Exc) { }
System.out.println(“Error
while building
btn_Start“);
Exc.printStackTrace();
}
return
btn_Start;
}
private
JButton get_btn_Print {/*
The code of this method auto-creates the element if it is not
already defined */ if
(btn_Print
== null) {
try
{
btn_Print
= new
JButton(); btn }_Print.setName(“btn_Prin);t“ btn_Print.setToolTipText(“Print
the Report“); btn_Print.setMargin(new
Insets(3,3,3,3)); btn_Print.setVerticalTextPosition(SwingConstants.CENTER); btn_Print.setHorizontalTextPosition(SwingConstants.CENTER); btn_Print.setText(“Print
the Report“); catch
(Throwable Exc) { }
System.out.println(“Error
while building
btn_Print“);
Exc.printStackTrace();
}
return
btn_Print;
}
private
JPanel get_pnl_Main {/*
The code of this method auto-creates the element if it is not
already defined */
if
(pnl_Main
== null) {
try
{
pnl_Main
= new
JPanel(); }pnl_Main“);pnl_Main pnl_Mainnew);
GridBagLayout()/*
Define GridBagConstraints for the Button to be added
*/ GridBagConstraints
gbc_btn_Select = new
GridBagConstraints() gbc_btn_Select.gridx
=
0; gbc_btn_Select.gridy
=
0; gbc_btn_Select.fill
=
GridBagConstraints.HORIZONTAL; gbc_btn_Select.weightx
=
1; gbc_btn_Select.anchor
=
GridBagConstraints.LINE_END;/*
Add the Button to the Panel; Button-position is controlled by
GridBagConstraints */ get_pnl_Main().add(get_btn_Select(),
gbc_btn_Select);/*
*
Define GridBagConstraints for the TextField to be added
*/
GridBagConstraints
gbc_txt_InputFile = new;
GridBagConstraints() /*gbc_.txt_InputFilegridx
=
0; gbc_.txt_InputFilegridy
=
1; gbc_.txt_InputFilefill
=
GridBagConstraints.HORIZONTAL; gbc_.txt_InputFileweightx
=
3; gbc_.txt_InputFileanchor
=
GridBagConstraints.CENTER;/*
Add the Button to the Panel; Button-position is controlled by
GridBagConstraints
*/ get_pnl_Main().add(get_;txt_InputFile(),
gbc_)txt_InputFile
*
Define GridBagConstraints for the Button to be added
*/
GridBagConstraints
gbc_btn_Start = new;
GridBagConstraints() gbc_btn_Start.gridx
=
0; gbc_btn_Start.gridy
=
2; gbc_btn_Start.fill
=
GridBagConstraints.HORIZONTAL; gbc_btn_Start.weightx
=
1; gbc_btn_Start.anchor
=
GridBagConstraints.LINE_START;/*
Add the Button to the Panel; Button-position is controlled by
GridBagConstraints */ get_pnl_Main().add(get_btn_Start(),
;gbc_btn_Start/*
*
Define GridBagConstraints for the Button to be added
*/
GridBagConstraints
gbc_btn_Print = new;
GridBagConstraints() gbc_btn_.Printgridx
=
2; gbc_btn_.Printgridy
=
2; gbc_btn_.Printfill
=
GridBagConstraints.HORIZONTAL; gbc_btn_.Printweightx
=
1; gbc_btn_.Printanchor
=
GridBagConstraints.LINE_START;/*
Add the Button to the Panel; Button-position is controlled by
GridBagConstraints */ get_pnl_Main().add(get_btn_gbc_btn_Print(),
Print); catch
(Throwable Exc) { }
System.out.println(“Error
while building
pnl_Main“);
Exc.printStackTrace();
}
return
pnl_Main;
}
private
void initialize() {
To
	Finally, the just coded 'Panel' must be defined as 'ContentPane' of
	the application.

    private
	void initialize()
	{
      setVisible(true);
      setSize(600,
	700);
      setTitle(„JavaScout-Tutorial
	– Base02 –
	DBLoad“);
      setContentPane(get_pnl_Main());
    }
Please
	remind to save the code just typed.
To
	see the result of the just typed code, run the application again by
	selecting >Run>Run
	As>Java Application.
The
	application should look like this containing the buttons and the
	text-field.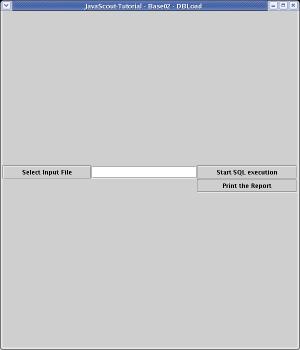
As
the final step, the TextArea within a ScrollPane is implemented.
To
define this construct is quite easy as the element are created
automatically at their first call.
Pleasv notify, that the
TextArea is passed as a parameter when the ScrollPane is
constructed. }
return
btn_Start; }
/* The code of
this method auto-creates the element if it is not already defined
*/
if
(txt_Report
== null) {
try
{
txt_Report
= new
JTextArea(); }txt_Report.setName(“);txt_Report“ txt_Report“Report“); txt_Report.setMargin(new
Insets(3,3,3,3)); catch
(Throwable Exc) { }
System.out.println(“Error
while building
);txt_Report“
Exc.printStackTrace();
}
return
txt_Report;
}
private
JScrollPane get_scroll_Report { private
JButton get_btn_Print {
/* The code
of this method auto-creates the element if it is not already defined
*/
if
(txt_Report
== null) {
try
{
scroll_Report
= new
JScrollPane(get_txt_Report()); }txt_Report.setName(“);scroll_Report“ .setPreferredSize(txt_Reportnew
Dimension(600, 600)); catch
(Throwable Exc) { }
System.out.println(“Error
while building
scroll_Report“);
Exc.printStackTrace();
}
return
scroll_Report;
}
To
add the ScrollPane to the Main-Pane requieres a few lines of code as
already seen before.
To let it span over the whole width, the
gridwidth-property
is set to 3.
That the ScrollPane fills the remaining space of the
window the fill-,
weightx-
and weighty-properties
are used.
The fill-property
defines, that the ScrollPane is allowed to stretch in all directions
when the size of the window changes.
The weightx-
and weighty-property
define, that the growth or shrink of the ScrollPane is 10 times as
high as the growth of other elements (e.g. buttons) when the size of
the window changes./*
Add the Button to the Panel; Button-position is controlled by
GridBagConstraints */
get_pnl_Main().add(get_btn_Start(),
;gbc_btn_Start)/*
*
Define GridBagConstraints for the Scroll-Pane to be added
*/
GridBagConstraints
gbc_scroll_Report = new;
GridBagConstraints() gbc_scroll_Report.gridx
= 0; gbc_scroll_Report.gridy
= 1; gbc_scroll_Report.gridwidth
=
3; gbc_scroll_Report.fill
=
GridBagConstraints.BOTH; gbc_scroll_Report.weightx
= 10; gbc_scroll_Report.weighty
=
10; gbc_scroll_Report.anchor
= GridBagConstraints.CENTER;/*
Add the Scroll-Pane to the Panel; Pane-position is controlled by
GridBagConstraints
*/ get_pnl_Main().add(get_scroll_Report(),
;gbc_scroll_Report)/*
*
Define GridBagConstraints for the Button to be added */
Please
	remind to save the code just typed.
To
	see the result of the just typed code, run the application again by
	selecting >Run>Run
	As>Java Application.
The
	application should look like this containing the all graphic
	elements.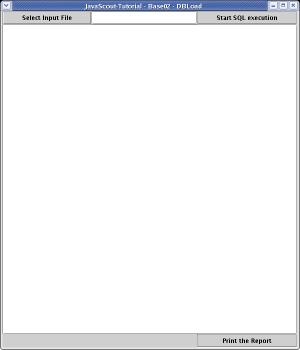
A
	nice trial is to change the dimension of the window and see how the
graphic-elements change theis size. 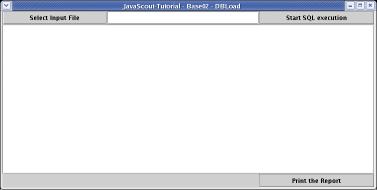
To
see, how the scrolling works a little piece of temporary code is
written to fill the text-area: .
private
void initialize()
{
setVisible(true);
setSize(600,
700);
setTitle(„JavaScout-Tutorial
– Base02 –
DBLoad“); setContentPane(get_pnl_Main()); }
filltext(123); private
void filltext(int
Lines) {
for(int
i=0; i<Line; i++){;
get_txt_Report().append(„This
is line “ + Integer.toString(i+1)
+ „\n“);
setTitle(„JavaScout-Tutorial
– Base02 – DBLoad“); } }
Please
	remind to save the code just typed.
To
	see the result of the just typed code, run the application again by
	selecting >Run>Run
	As>Java Application.
The
	application should look like this containing the printout and the
	vertical-scroll-bar.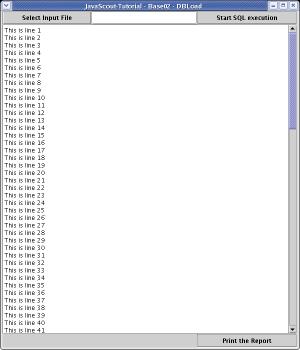
Please
	remove the temporary code to fill the text-area before progressing
	to the next step !
Next
Step:
An
ActionListener is added and the method for a file-dialog (to select
the input-file with the SQL-commands) is coded:
JS_Base02c
- Adding an action: selecting the file with the SQL-commands.