Select
>File>New>Project.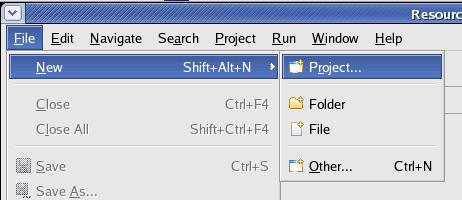
|
Last
revision of this document: |
Preface:First,
this lesson is far away from the Struts-framework.
While writing
the lesson about the Struts-framework incorporating a Session-Bean, I
realized that this would mean a lot of typing before any result is
seen.
And if there is a typing error - no result is shown at all.
So
I excluded the writing of a Session-Bean into this lesson.
Another
main-task of this lesson is to use XDoclet.
XDoclet is a technique
to control the generation of code or parameterization-data by
incorporating XDoclet commands in the developed program-files.
Credits:A
very good seed was the JBoss-IDE
1.3.0 Tutorial Guide by Hans Dockter and Laurent Etiemble.
JS_Base01 – HelloWorld, developed using Eclipse completed – and its prerequisites too.
Basic knowledge of Java programming language; particular the usage of libraries.
Preparation:Create
a new project (named JS_Struts04)
in Eclipse:
Select
	>File>New>Project.
In
	the New Project window select >Java Project and
	press the [Next >] button thereafter.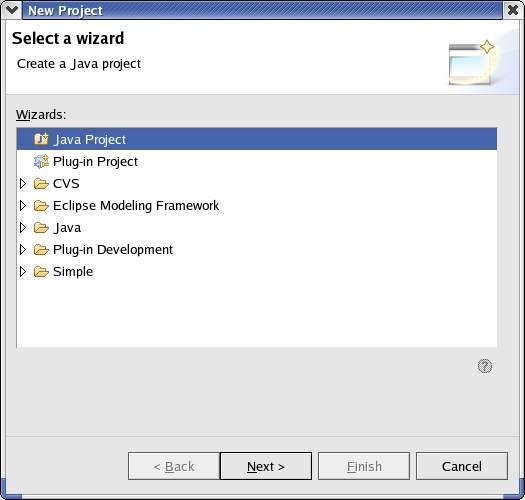
Enter
	the Project Name (JS_Stuts04),

select 'Create
	separate source and output folders',
leave all other values
	unchanged and press
	the [Next >] button thereafter.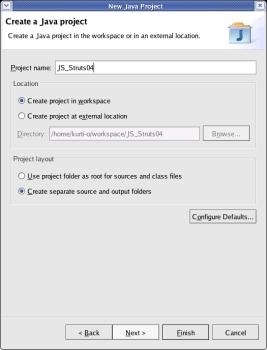
Change
	the 'Default output folder' to JS_Stuts04/gen/classes,

and click the [
	Add Folder... ] button to define a different Source-Folder.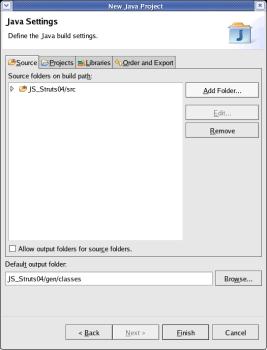
On
the 'Source Folder Selection' window select 'src' and click
the [
Create New Folder... ] button.
On the 'New Folder' window
enter java as
'Folder name' and click
the [
OK ] button.
Click the
on the 'Source Folder
Selection' window to add the new Source.[
OK ] button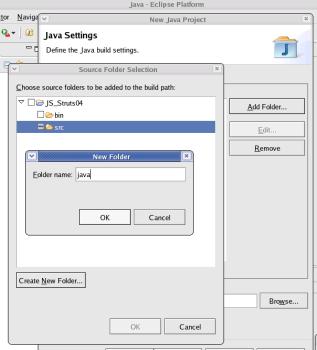
As
	a new Source-Folder is defined, select 'src' and click
	the [
	Remove ] button.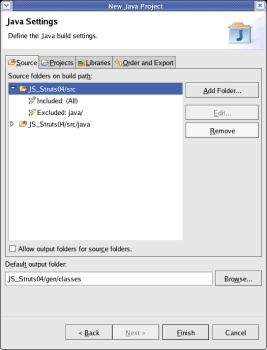
If
	you expand the structure of the remaining 'Source Folder' (src/java)
	by clicking onto the little triangle, you will see the
	following:.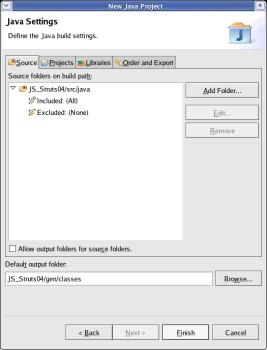
Click
	the [
	Finish ] button to create the project.
Expanding the project
	in the 'Package Explorer', it should look like this: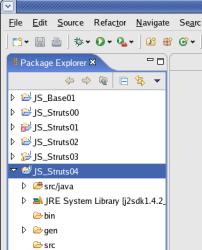
Defining
the Libraries in the Java Build Path:
Here
all the standard-libraries with classes called either by individual
code or by Struts-functions are defined.
These are defined now as
otherwise errors are indicated when the Java-code for the servlet is
written.
Right
	click onto the project 'JS_Struts04' and select >Properties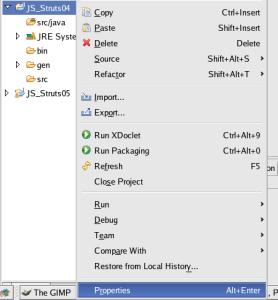
In
the left window select 'Java Build Path'.
Then
select the tab 'Libraries'.First,
the JAR (Java-ARchive) with the general methods for a servlet is
needed.
This servlet is delivered with the JBoss-IDE plugin for
Eclipse. The home-directory for Eclipse is already defined with the
variable 'ECLIPSE_HOME'.
Click the button [Add Variable ...]
and select ECLIPSE_HOME on the window popping up.
Then click
the button [Extend...].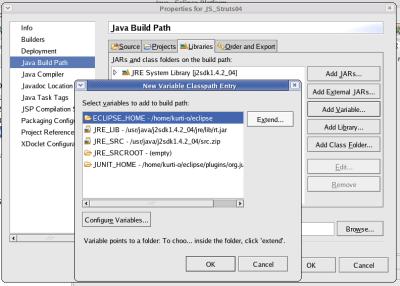
Manouvre
	to the 'plugins/org.eclipse.tomcat_4.1.xx' directory and
	select the file 'servlet.jar'.
Then click the [ OK ]
	button.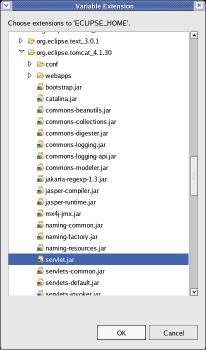
Next,
	the JAR for the J2EE-base-classes have to be added.
For this
	lesson it is assumed, that the JBoss
	Java-Application-Server is installed on the local machine in
	directory '/opt/jboss'.
Click the button [Add External Jars
	...], manouvre
	to the '/opt/jboss/server/default/lib' folder and select the file
	'jboss-j2ee.jar'.
Then click the [ OK ] button on the 'JAR
	Selection' window.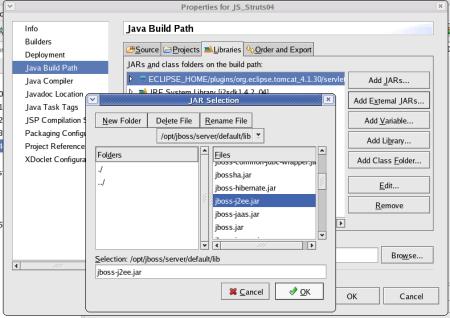
Verify,
that the list of JARs in the Build Path looks like the
screenshot..
Then click the [ OK ] button.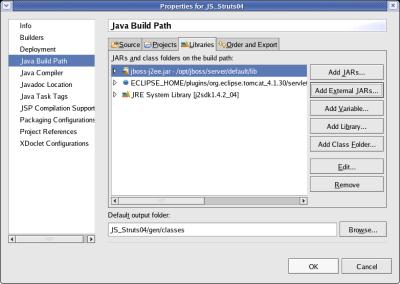
Defining
the static values:
When
incorporating the project of this lesson into the next lesson, the
time/date-format can be choosen by a combo-box.
To have this
values (for the choice) available, they are defined in an
Java-'Interface'.
Right
	click onto the project 'JS_Struts04' and select >New>Interface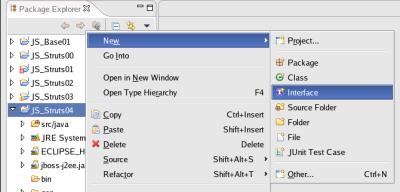
Enter
	the Package (js_sl04.staticvalues)
	and the (Interface-)Name (LanguageConstants),
	leave all other values unchanged and click the [Finish]
	button.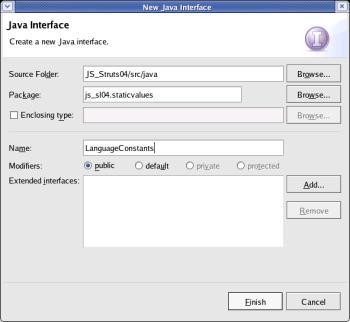
Eclipse
has already generated a template and the individual code can be
entered.
To shorten the list, comments from the template are not
shown in the following code.package
js_sl04.staticvalues;import
java.util.*;public
interface
LanguageConstants {
public
static final String[][] Language = { { “US“,
“Time/Date-format
in US-style“}, { {“FR“,
“Continue
en Francais“},“DE“,
“Datums/Zeit-Anzeige
in deutschem Format“}} public
static final Locale[] Country_Locale =
{ Locale.US, Locale.GERMANY Locale.FRANCE,}}The
entered text can be saved by clicking the right mouse-button and
selecting
Save
from the
context menu.
A
short explanation of the code.
import
java.util.*;Directive
to import the library with the 'Locale's, i.e. the parameters which
define, how Date and Time should be presented in a text-string.
public
static final String[][] Language =
{ {“US“,
“Time/Date-format
in US-style“}, { {“FR“,
“Continue
en Francais“},“DE“,
“Datums/Zeit-Anzeige
in deutschem Format“}
}An
multi-dimesional-array with the codes (values) and the displayed
text strings. These static values (constants) will be used in the
next lessons.
The code is to define which selection was made from
the combo-box and to control the selection of the next displayed
file of the web-services.
The text strings are visible in the
combo-box and guide the user through the selection.
public
static final Locale[] Country_Locale =
{.
Locale.US, Locale.FRANCE, Locale.GERMANY
}An
array with the codes for the parameters that define, how the
formatted text-string with Date and Time looks
Create
and code the Session-Bean:
The
Session-Bean contains the 'Business-Logic' ('Model' in
Struts-terminology).
For simplicity, the first Session-Bean in my
series of tutorials is a 'Stateless Session-Bean'.
Stateless
means, that a Method of the session bean is called and returns a
result without keeping any data for the next call.
Right
	click onto the project 'JS_Struts04' and select >New>Class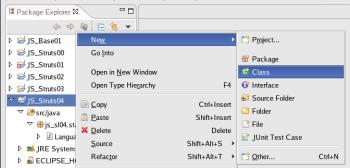
Enter
	the Package (js_sl04.ejb.bean),
	the (Class-)Name (ShowTimeDateBean)
	and the Interface (javax.ejb.SessionBean)
	using the [ Add... ]-button, check Constructors
	from superclass and
	Inherited abstract
	methods, leave all other values unchanged and press the
	[Finish] button.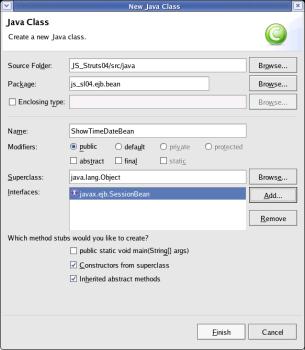
Eclipse
has already generated a template and the individual code can be
entered.
To shorten the list, comments from the template are not
shown in the following code.package
js_sl04.ejb;import
java.rmi.RemoteException;import
javax.ejb.CreateException;import
javax.ejb.EJBException;import
import
javax.ejb.SessionBean;import
javax.ejb.SessionContext;java.text.DateFormat;import
java.util.*;import
js_sl04.staticvalues.*;/**
*
@author kurti-o
*
* @ejb.bean name =
“ShowTimeDate“ * display-name
=
“ShowTimeDate
EJB“ * * description
= “EJB
that gets and format system date/time“ * view-type
=
“remote“ * jndi-name
=
“ejb/js_sl04/ShowTimeDate“
*/public
class ShowTimeDateBean
implements
SessionBean { }public
ShowTimeDateBean() {
super();
}public
void ejbCreate() throws
CreateException { public
void ejbActivate() throws
EJBException, RemoteException
{} }public
void ejbPassivate() throws
EJBException, RemoteException
{ }public
void ejbRemove() throws
EJBException, RemoteException
{ }public
void setSessionContext(SessionContext arg0)
throws
EJBException, RemoteException
{
/** *
@param parmCountry_Code * *
@return
*
@ejb.interface-method view-Type = “remote“ */ public
String[] getTimeDateString(String parmCountry_Code)
{ /** *
prepare the array to be returned */
String[]
arrayReturnValues = new
String[2]; arrayReturnValues[0]
= parmCountry_Code; arrayReturnValues[1]
= “Invalid
Country-Code passed“; /** *
Search the array with the Country-Code (Language)
*
and get the corresponding Locale to format Date / Time
*
The current Date / Time is derived from the
System */
int
loci = 0; int
LanguageArraySize = LanguageConstants.Language.length; for
(loci=0;
loci < LanguageArraySize; loci++) {
if
((LanguageConstants.Language[loci][0]).trim().compareToIgnoreCase(parmCountry_Code.trim())
== 0) {
Date
now = new
Date(); arrayReturnValues[1]
= DateFormat.getDateInstance(DateFormat.FULL,
LanguageConstants.Country_Locale[loci]).format(now) };; arrayReturnValues[1]
+= “
/
“; arrayReturnValues[1]
+= DateFormat.getTimeInstance(DateFormat.FULL,
LanguageConstants.Country_Locale[loci]).format(now);
}; return
arrayReturnValues; }}The
entered text can be saved by clicking the right mouse-button and
selecting
Save
from the
context menu.
A
short explanation of the code.
package
js_sl04.ejb.bean;
This name is connected with the naming of the
folder, where the source-code is stored.
During the
parametrization of XDoclet, java-code-files in this folder are the
source for generating.
import
java.rmi.RemoteException;import
javax.ejb.CreateException;import
javax.ejb.EJBException;import
javax.ejb.SessionBean;import
javax.ejb.SessionContext;.
import
java.text.DateFormat;import
java.util.*;
This libraries contain classes for getting
the actual Date/Time from the system and formatting it into a
text-string.
import
Import
directives for the 'Interface' with the static values for Code,
description and 'Locale'. js_sl04.staticvalues.*;
This 'Interface' was defined earlier
in this lesson and resides within the project.
*
@ejb.bean name = “ShowTimeDate“Directive
for the XDoclet-routine to generate deployment-information for the
Java-Application-Server * display-name
= “ShowTimeDate
EJB“ * description
= “EJB that gets
and format system date/time“ * view-type
= “remote“ * jndi-name
= “ejb/js_sl04/ShowTimeDate“.
public
class ShowTimeDateBean
implements
SessionBean {
directs the compiler to inherit
variables and methods from the super-class (i.e.implements
SessionBean).
public
ShowTimeDateBean()
{
super();
} ,
which inherits all variables and methods from the superclass
(super()SessionBean).
public
void ejbCreate()
CreateException {throws}
public
void ejbActivate()
EJBException, RemoteException
{throws}
public
void ejbPassivate()
EJBException,
RemoteException {throws}
public
void ejbRemove()
EJBException, RemoteException
{throws}
public
void setSessionContext(SessionContext
arg0)
EJBException, RemoteException
{throws}
SessionBean)
and have to be implemented here.
This lesson makes not already
use of them - so they are just implemented without further code
inside.
/**Directive
for the XDoclet-routine to generate deployment-information for the
Java-Application-Server.
*
@param parmCountry_Code * @return *
* @ejb.interface-method view-type =
“remote“
*/
The
view-type =
“remote“.
public
String[] getTimeDateString(String
parmCountry_Code) {
This method contains
the (small and simple) business-logic.
As parameter
(parmCountry_Code)
it takes the selection of the user, how the date/time should be
formatted.
It returns an array with 2 strings;
* the first
string simply returns the value of the parameter;
* the second
string contains the formatted date/time or an error-message if the
parameter is unknown.
coding
Please
see the comments and re-engineer the business-rules out of the
Java-commands
Defining
the XDoclet parameters:
XDoclet
is a technique, where code can be generated out of 'comments'.
The XDoclet-engine is extremely powerfull and not only restricted to
Java, EJB or Eclipse - but it would give you a headache trying to
understand the functions completely.
For
this lesson we can rely on the fact, that the was delivered with
pre-configured command-files for the XDoclet-engine and allows
functions necessary to develop EJBs (Enterprise Java Beans) and
Web-Services.
The
following instructions are to parameterize the XDoclet-generation by
'point and click' - and entering some text every now and then.
Do
the configuration as follows:
Right
	click onto the project 'JS_Struts04' and select >Properties.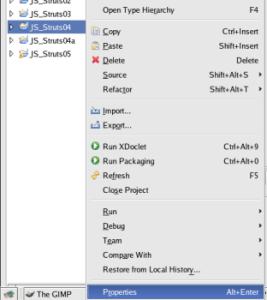
In
	the left window select 'XDoclet Configurations'.
Right-click
	into the upper area and in the popped-up menue select Add... .
Enter
	the name of the generation configuration (EJB)
	into the field 'Name' and click the [ OK ]-button.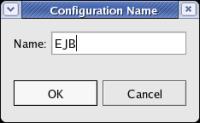
Select
	the 'EJB' configuration in the upper area.
Right-click
	into the lower middle area and in the popped-up menue select Add
	Doclet... .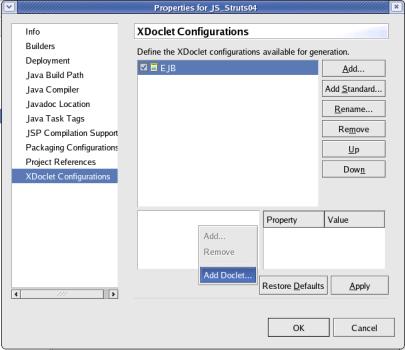
A
	list of available doclet-templates will appear.
Select ejbdoclet
	and click the [ OK ]-button.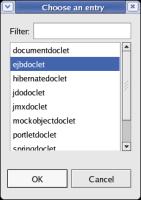
Select
	'ejbdoclet' (on the lower middle area).
On the lower right area
	the properties are shown. The checkmark selects them and
	double-clicking onto them opens a window to change the Value.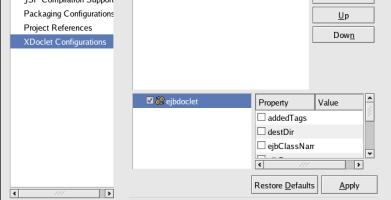
The
	checkmark selects them and double-clicking onto them opens a window
	to change the Value.
Check
	the properties destDir and ejbSpec.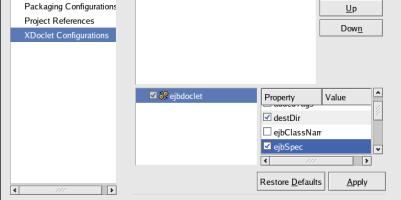
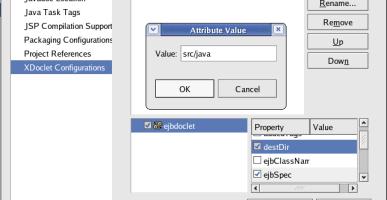
Double
click onto 'destDir',
enter
the name of the value (src/java)
into the field 'Value' and click the [ OK ]-button.
.
Purpose:
This defines, that the source-code for EJBs (Enterprise Java
Beans) are stored in the folder 'src/java'.
The term 'destDir' is
a little bit misleading - probably it was named so because for the
XDoclet-engine it ist the 'destination' were to look.
The
XDoclect engine inspects all files ending with '...Bean.java'
(defined in a later step) and generates other files if directed so
by XDoclet-commands in the '...Bean.java'-files.
Double
	click onto 'ejbSpec',
enter
	the name of the value (2.0)
	into the field 'Value' and click the [ OK ]-button.
	.


Purpose:

This defines, that the source-code is and the generated
	files should be according to the EJB 2.0 specifications.
To
	save space, in following steps a screenshot is no longer
	included.
The properties to check and the values will be shown in
	a table - like this:
|
Property |
Property |
Value |
Purpose |
|---|---|---|---|
|
|
destDir |
src/java |
|
|
|
ejbSpec |
2.0 |
|
After
	completing the parameterization, the properties for the 'ejbdoclet'
should look like this: 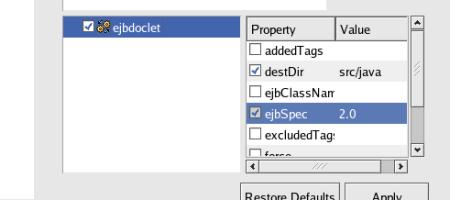
The
	ejbdoclet has several subtasks.
To
	add a subtask, right-click onto
	ejbdoclet
	and in the popped-up menue select
	Add... .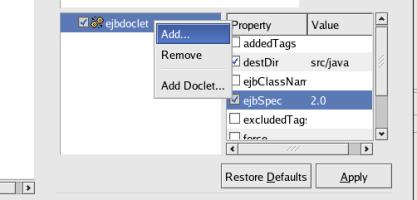
From
	the list select fileset and click the
	[
	OK ] button.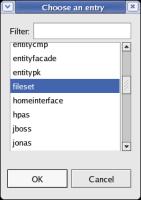
Set
	the following properties:
|
|
Property |
Value / Comments |
Purpose |
|---|---|---|---|
|
|
dir |
src/java |
|
|
|
excludes |
This property is checked as default; uncheck it. |
|
|
|
includes |
**/*Bean.java |
|
After
	completing the parameterization, the properties for the 'fileset'
	should look like this:

Add
	the subtask deploymentdescriptor
	and set the following property:
|
|
Property |
Value / Comments |
Purpose |
|---|---|---|---|
|
|
destDir |
gen/META-INF |
|
After
	completing the parameterization, the properties for the
	'deploymentdescriptor' should look like this:
Add
	the subtask jboss
	and set the following properties:
|
|
Property |
Value / Comments |
Purpose |
|---|---|---|---|
|
|
Version |
3.0 |
|
|
|
destDir |
gen/META-INF |
|
After
	completing the parameterization, the properties for the 'jboss'
	should look like this: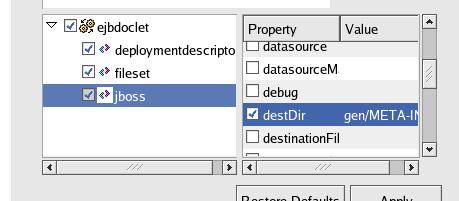
Add
	the subtask packageSubstitution
	and set the following properties:
|
|
Property |
Value / Comments |
Purpose |
|---|---|---|---|
|
|
packages |
bean |
|
|
|
substituteWith |
interfaces |
|
After
	completing the parameterization, the properties for the 'jboss'
	should look like this: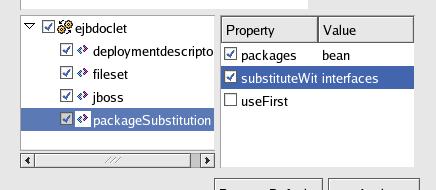
Add
	the subtasks homeinterface and remoteinterface; there
	are no properties set.
Purpose:
These direct the
	XDoclet-engine to generate Home- and Remote-interfaces. These
	interfaces are imported by client-programs and are needed to call
	variables and methods of the EJB running within the
	Java-Application-Server.

After completing
	the parameterization, the properties for the 'jboss' should look
	like this:
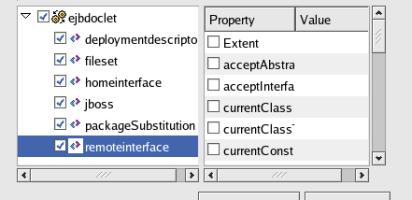
Click
	the [ OK ] button on the 'Properties for JS_Struts04' window
	and the 'xdoclet-build.xml' file will be generated.
It is listed
	in the 'Package Explorer' section:

To
	start the XDoclet engine right click
	onto the project 'JS_Struts04' and select >Run
XDoclet. 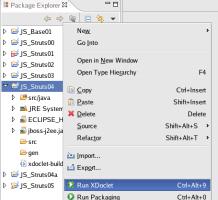
The
build-process can be watched in the 'console'-window. 
After
the generation, the following files should be auto-generated:*
src/java/js_sl04.ejb.interfaces/ShowTimeDate.java
*
src/java/js_sl04.ejb.interfaces/ShowTimeDateHome.java
*
gen/META-INF/ejb-jar.xml *
gen/META-INF/jboss.xml 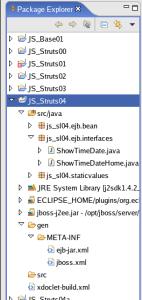
Making
the packaging configuration for the files to be deployed and
pack the files into a JAR (Java-ARchive):
For
instructions how to define the files to be packed into the JAR-file,
please see the instruction with screen shots at
Making
the packaging configuration and pack the HTML-files into a WAR
(Web-ARchive) of
JS_Struts02 – JSP
in an EAR.
Create
a file named JS_Struts04EJB.jar
and define the following files (with Prefixes as
specified):
|
Name of the file or the folder to be packed into the JS_Struts03.war file |
Prefix
as to be entered on the window |
Reason |
|---|---|---|
|
Folder 'gen/classes' |
|
Class after compiling the written Java-code for the Beans and Interfaces. |
|
File 'gen/META-INF/ejb-jar.xml' |
META-INF |
General deployment-information for the Java-Application-Server. |
|
File 'gen/META-INF/jboss.xml' |
META-INF |
Particular deployment-information for the JBoss Java-Application-Server. |
To
verify, that the files of the selected folder and its sub-folders is
in the Packaging Configuration, the 'Properties'-window should look
like the following screenshot.
To
generate a file with the data to be packaged, click the
[
OK ]-button.
To
start the packaging-process, right-click onto the project
(JS_Struts04) and select >Run
Packaging
.
The
build-process can be watched in the 'console'-window.
For a
detailed description with screenshots please see at
Making
the packaging configuration and pack the HTML-files into a WAR
(Web-ARchive) of
JS_Struts02 – JSP
in an EAR.
After
the packaging process ended, the 'JS_Struts04EJB.jar'-file is
visible within the project: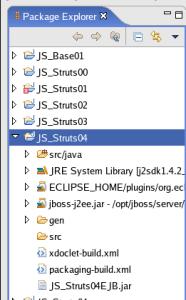
Making
the packaging configuration for the libraries used by fat-clients
or web-services and pack the files into a JAR (Java-ARchive):This
step is not absolutely necessary to deploy the result of this
lesson.
It is a prerequisite for client-programs (either
stand-alone / fat-clients or servlets within a web-service).
It is
also possible to skip it and do it before writing a fat-client or a
web-service.
For
instructions how to define the files to be packed into the JAR-file,
please see the instruction with screen shots at
Making
the packaging configuration and pack the HTML-files into a WAR
(Web-ARchive) of
JS_Struts02 – JSP
in an EAR.
Create
a file named JS_Struts04EJB-client.jar
and define the following folder: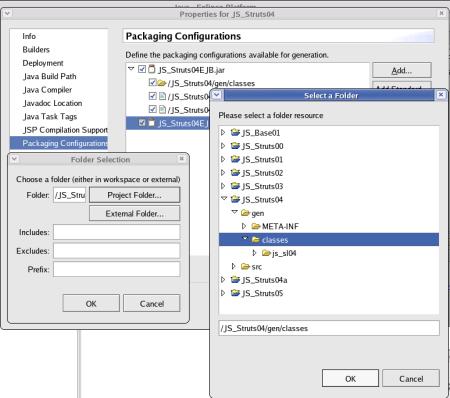
As
an addition to the previous lesson, 'Includes'-criteria are
specified.
To finish, click the [ OK ] button.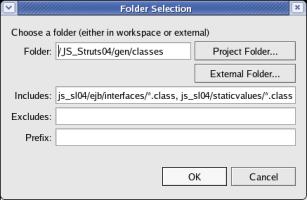
This
directs the packager to pack only
classes in the package
'js_sl04/ejb/interfaces'
(these are the classes generated by
XDoclet and containing the Interfaces to access the EJB from remote
machines)
and classes that contain Constant-values - in the
package 'js_sl04/staticvalues'
(these will be used to offer the
user a selection of available country-codes).
.
To
verify, that the files of the selected folder and its sub-folders is
in the Packaging Configuration, the 'Properties'-window should look
like the following screenshot.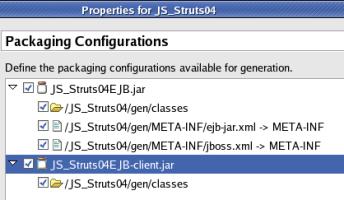
To
generate a file with the data to be packaged, click the
[ OK ]-button.
To
	start the packaging-process, right-click onto the project
	(JS_Struts04) and select >Run
	Packaging .
The
	build-process can be watched in the 'console'-window.
For a
	detailed description with screenshots please see at
	Making
	the packaging configuration and pack the HTML-files into a WAR
	(Web-ARchive) of
	JS_Struts02 – JSP
	in an EAR.

After
	the packaging process ended, the 'JS_Struts04EJB-client.jar'-file is
	visible within the project: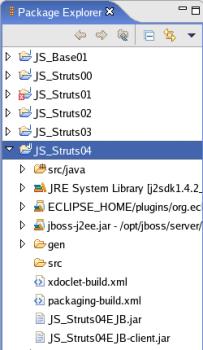
top.
Run
/ Test:
This is the final verification if the generated 'JS_Struts04EJB.jar' file (with an Java ARchive structure) is running error-free within a Java-Application-Server.
For the conceptional background of deployment to a Java-Application-Server and the assumptions of the directories with the Eclipse-workspace and and the Java-Application-Server-deployment, please see Run / Test in JS_Struts01 – HTML in a WAR .
To
deploy the EAR-file, open a 'Terminal'-window and enter the
following command:
cp
/home/kurti-o/workspace/JS_Struts04/JS_Struts04EJB.jar /opt/jboss/server/default/deploy![]()
To
monitor the deployment of the EAR-file in the
Java-Application-Server please see
Run
/ Test in JS_Struts01
– HTML in a WAR .
There
is no easy visible result.
First, a good sign is, that the
JBoss-Application-Server does not produce a dump when the file is
deployed.
Second, the EJB is shown as registered result of lesson
3 can be seen on a web-browser.
Enter the following URL:
http://192.168.0.62:8080/jmx-console
(In
the example, th running on a machine
with the TCP/IP-address '192.168.0.62'.)e
JBoss-Application-Server
is
scroll down until you
see jboss.j2ee: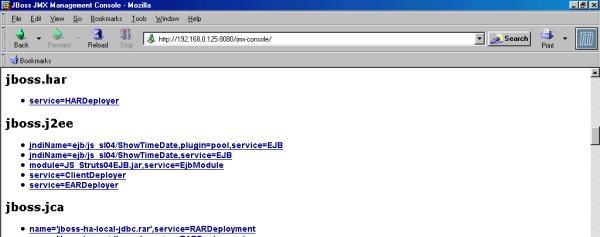
You
	should see
two entries with
	jndi-name=ejb/js_sl04/ShowDateTime, .....
and
one
	entry with
	module=JS_Struts04EJB.jar,
	.. .
Note:
There
is also a functionality in Eclipse to define the
Java-Application-Server and deploy and undeploy with an
Eclipse-function.
I was not pretty happy with that feature. My
JBoss-Application-Server
isrunning
on another machine. When this machine is not running during the start
of Eclipse, the Eclipse-function gets confused, reports that a
changed WAR-file is deployed - but the old file is not
overwritten.
So I prefer to stay on the more secure side and copy
the files using the 'Terminal'-window.
Related
Documents: