Select
	>File>New>Project.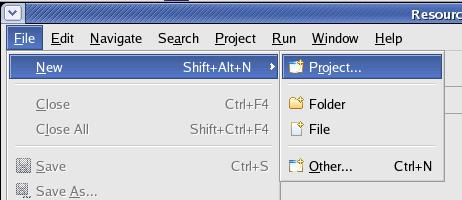
|
Last
revision of this document: |
This
document describes the development of a simple Java-program under
Eclipse
to
test the EJB developed in JS_Struts04 -
Creating the Session-Bean with the Model.
This program allows
to enter parameter via the command-line and see the output according
to the entered parameter.
Credits:JS_Struts04 – Creating the Session-Bean with the 'Model' completed - and its prerequisites too.
Recommended:
JS_Base01
- HelloWorld completed
– particularly if you are not familiar with Eclipse or new to
Java-programming.
Preparation:Create
a new project (named JS_Struts04a)
in Eclipse:
Select
>File>New>Project.
In
	the New Project window select >Java Project and
	press the [Next >] button thereafter.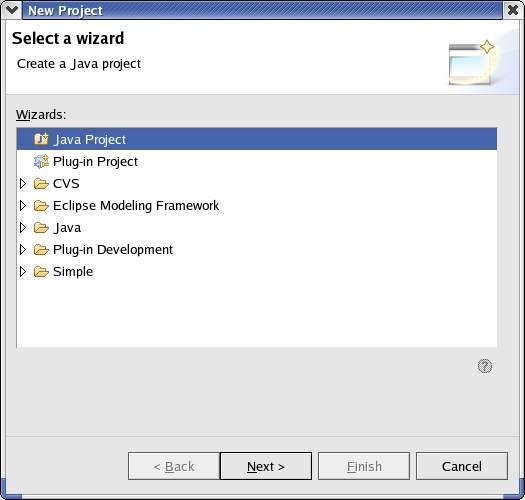
Enter
	the Project Name (JS_Struts04a),

leave all other values unchanged and press
	the [Finish] button thereafter.
Create separate directories for the source-code:
Right
	click onto the project 'JS_Struts04a' and select >New>Folder.
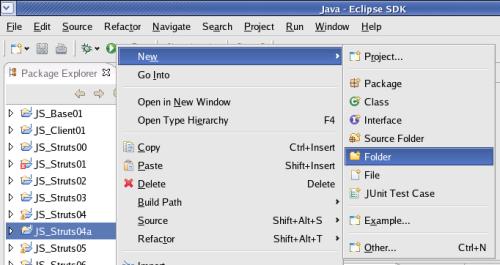
On
	the next window select the parent-folder ('JS_Struts04a'), enter the
	name of the new folder ('src/java') and click the [ Finish
]-button. 
Define
the 'Build Path' (were the compiler looks for Java-source-code):
Right
	click onto the Project 'JS_Struts04a' and select Properties.

On
	the next window, the root-folder ('JS_Struts04a') has to be removed
	from the Build Path.
To do so, select 'Java Build Path', Tab
	'Source', mark the project ('Java_Struts04a') and click the
[Remove]-button 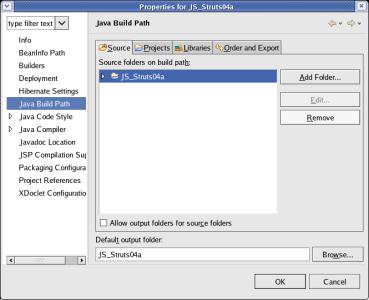
To
	avoid a collision of the folder structure for source and
	output-folders, the output-folder is moved from the root of the
	project ('JS_Struts00') to a subfolder named 'gen/classes' (gen –
	for generated).
To do so, enter JS_Struts04a/gen/classes
in the entry-filed 'Default output-folder'. 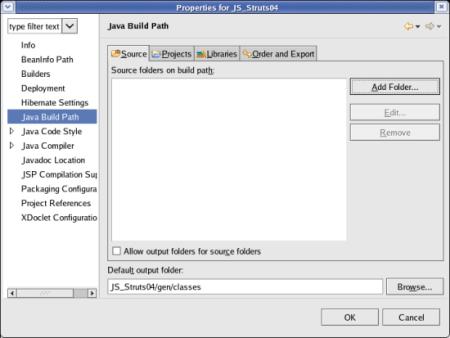
On
the same window click the [Add Folder... ]-button.On
the next window expand the structure until you can see the folder
'java' under the folder 'src'.
Check
the folder 'java' and click the [ OK ]-button.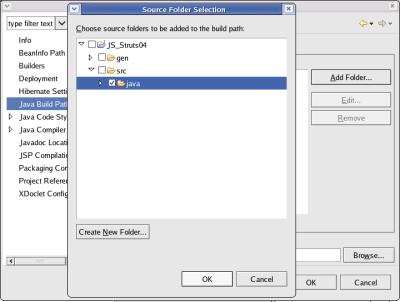
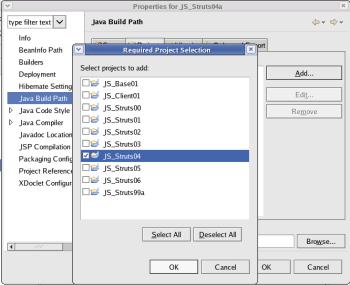
Add
other Projects (from were pre-compiled classes can be imported) to
the 'Java Build Path':
As
some classes from the project
JS_Struts04
– Creating the Session-Bean with the 'Model'
are
needed, this project has to be added to the 'Java Build Path'.
To
do so, select the tab 'Projects'.
Click
the [ Add... ]-button.On
the next window Check the
project 'JS_Struts04' and click the [ OK ]-button.
The
added project will be reflected. 
Add
Libraries (outside Eclipse) to the 'Java Build Path':
To
	make a client able to connect to an EJB, two libraries delivered
	with the Java-Application-Server (JBoss
	in these tutorials) have to be added to the 'Java Build Path'.
To
	do so, select the tab 'Libraries'.
Click
	the [ Add External JARs... ]-button.
On
	the following window manouvre to the directory /opt/jboss/client
	(if JBoss is installed in /opt/jboss; in case of another
	Java-Application-Server or another installation-directory manouvre
	to the corresponding directory).
Select
	'jboss-client.jar' and click
	the [ OK ]-button.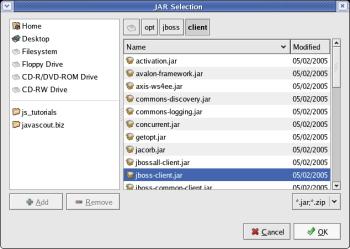
Repeat
	the previous two steps to select
	'jboss-j2ee.jar'
The
	added libraries will be reflected.
Close the 'Properties' window
	by clicking
	the [ OK ]-button.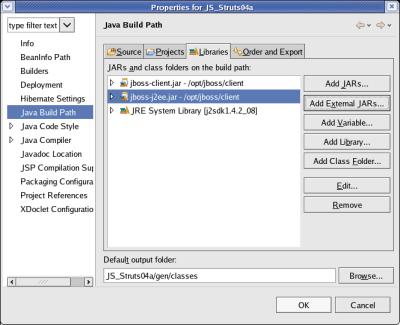
Coding:Create
a new Java Class by selecting the project (JS_Struts04a) and
clicking the associated button on the head-panel.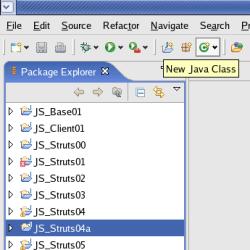
Enter
	the Package(-name) (js_sl04.client)
	, the (Class-)Name (JS_Struts04Client)
	, check that you
	would like to create 'public
	static void main(String[ ] args)', leave all other values
	unchanged and press
the [Finish] button thereafter. 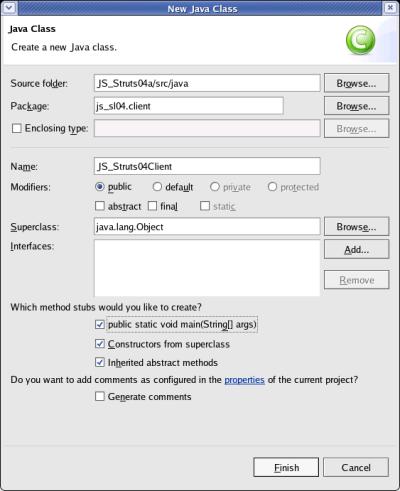
Eclipse
has already generated a template and the individual code can be
entered.package
js_sl04.client;import
java.util.Hashtable;import
javax.naming.InitialContext;import
import
javax.naming.NamingException;java.rmi.RemoteException;
import
javax.ejb.CreateException;import
java.io.IOException;import
js_sl04.ejb.interfaces.*;import
js_sl04.staticvalues.LanguageConstants;public
class
JS_Struts04Client { }public
Struts04Client()
{
super();
public
static void main(String[] args) { int
loci = 0; int
LanguageArraySize = LanguageConstants.Language.length
; String
str_Question = “Please
enter the country [“;
for
(loci=0;
loci < LanguageArraySize; loci++) {
str_Question
+= };LanguageConstants.[loci][0].trim().toUpperCase();
Language
if
((loci + 1) <
LanguageArraySize) str_Question += “, “; str_Question
+= “]
or leave blank to quit the program:“; String
str_Answer = “AA“; byte
Console_Buffer[] = new
byte[80]; int
int_Console_Buffer_length;while
(str_Answer.trim().length() > 0)
{
System.out.print(str_Question);
try
{
int_Console_Buffer_length
= System.in.read(Console_Buffer, 0, 80);
str_Answer
= new
String(Console_Buffer, 0,
int_Console_Buffer_length);
str_Answer
= str_Answer.toUpperCase().trim();
} }catch
(IOException e){
e.printStackTrace();
}
if
(str_Answer.length() > 0) {
System.out.println(“Answer:
“ +
str_Answer);
try
{
Hashtable
ContextProperties = new
Hashtable(); ContextProperties.put(InitialContext. ContextProperties.put(InitialContext.PROVIDER_URL
,
“jnp://192.168.0.125:1099“);INITIAL_CONTEXT_FACTORY, “org.jnp.interfaces.NamingContextFactory“);
InitialContext
initialContext
= ;new
InitialContext(ContextProperties)
System.out.println(“InitialContext
established“);
ShowTimeDateHome
BeanHome;
BeanHome
= (ShowTimeDateHome)
initialContext.lookup(ShowTimeDateHome.JNDI_NAME);
System.out.println(“BeanHome
established“); }
ShowTimeDate
BeanInstance =
BeanHome.create();
System.out.println(“BeanInstance
established“);
String[]
result =
BeanInstance.getTimeDateString(str_Answer);
System.out.println(result[0]); System.out.println(result[1]); catch
(NamingException
e){
System.out.println( }“NamingException“); e.printStackTrace(); catch
(RemoteException
e){
System.out.println( }“RemoteException“); e.printStackTrace(); catch
(CreateException
e){
System.out.println( }“CreateException“); e.printStackTrace();}}The
entered text can be saved by clicking the right mouse-button and
selecting Save
from
the context menu.
A
short explanation of the code.
package
js_sl04.client;
This name is connected with the naming of the
folder, where the source-code is stored.
During the
parametrization of XDoclet, java-code-files in this folder are the
source for generating.
import
import
java.util.Hashtable;import
javax.naming.InitialContext;javax.naming.NamingException;import
java.rmi.RemoteException;import
javax.ejb.CreateException;import
java.io.IOException;.
import
js_sl04.ejb.interfaces.*;
This
library allows the client, to establish the object-structure of the
EJB and furtheron to code / decode the data-streams excahnged
between client and EJB.
import
js_sl04.staticvalues.LanguageConstants;
This
library allows the client, to establish the object-structure of the
EJB and furtheron to code / decode the data-streams excahnged
between client and EJB.
import
Import
directives for the 'Interface' with the static values for Code,
description and 'Locale'. js_sl04.staticvalues.*;
This 'Interface' was defined earlier
in this lesson and resides within the project.
int
loci = 0;int
LanguageArraySize = LanguageConstants.Language.length
;String
str_Question = “Please
enter the country [“;
for
(loci=0; loci < LanguageArraySize; loci++) {This
code generates a string which will be used to 'print out' the
question on the command-line.
str_Question
+= };LanguageConstants.[loci][0].trim().toUpperCase();
Language
if
((loci + 1) <
LanguageArraySize) str_Question += “, “;str_Question
+= “]
or leave blank to quit the program:“;
The for-loop
lists all available country-codes that were defined and coded in the
tutorial for JS_Struts04
– Creating the Session-Bean with the 'Model'.
while
(str_Answer.trim().length() > 0) {
. .
.
System.out.print(str_Question);'Printing'
out the question-string to the command-line, 'read' the answer from
the command-line (maximum 80 characters) and put the answer into a
string - converted to uppercase and without leading or trailing
blanks.
try
{
int_Console_Buffer_length
= System.in.read(Console_Buffer, 0, 80);
str_Answer
= new
String(Console_Buffer, 0, int_Console_Buffer_length);
str_Answer
= str_Answer.toUpperCase().trim();
} catch
(IOException e){
e.printStackTrace();
}
An error is 'catched' and 'printed' out to the
command-line.
if
(str_Answer.length() > 0) {If
the entered string was not empty, the usage of the EJB is
starting. System.out.println(“Answer:
“ + str_Answer);
.
. .
But before, the entered value is 'printed' out for
monitoring purposes.
try
{
Hashtable
ContextProperties = new
Hashtable(); ContextProperties.put(InitialContext. InitialContextPROVIDER_URL
,
“jnp://192.168.0.125:1099“); ContextProperties.put(InitialContext.INITIAL_CONTEXT_FACTORY, “org.jnp.interfaces.NamingContextFactory“);
initialContext
= ;new
InitialContext(ContextProperties)
System.out.println(“InitialContext
established“);InitialContext
is responsible for a lookup if the adressed Java-Application-Server
is alive and for further exchanging the data with the
Java-Application-Server.
For this purpose, the InitialContext
needs information about the protocol, TCP/IP-address and the port of
the Java-Application-Server ( jnp
- the protocol, 192.168.0.125
- the TCP/IP-address valid for this tutorial and 1099
- the port a Java-Application-Server is using as default) and the
information about the coding/decoding-method of object-structures
into/from a bitstream ( org.jnp.interfaces.NamingContextFactory
- the library with the
standard Java method).
ShowTimeDateHome
BeanHome;This
piece of code is building the 'blueprint' of the client-side-part
that can communicate with an EJB running on an
Java-Application-Server.
BeanHome =
(ShowTimeDateHome)
initialContext.lookup(ShowTimeDateHome.JNDI_NAME);
System.out.println(“BeanHome
established“);
In this tutorial the name of the EJB is
covered behind the constant ShowTimeDateHome.,
which is imported via the library JNDI_NAMEjs_sl04.ejb.interfaces.*.
ShowTimeDate
BeanInstance =
BeanHome.create();
System.out.println(“BeanInstance
established“);
String[]
result =
BeanInstance.getTimeDateString(str_Answer);
System.out.println(result[0]); System.out.println(result[1]);
catch
(NamingException
e){
System.out.println( }“NamingException“); e.printStackTrace(); catch
(RemoteException
e){
System.out.println( }“RemoteException“); e.printStackTrace(); catch
(CreateException
e){
System.out.println( }“CreateException“); e.printStackTrace();
Run
/ Test, Part 1:
Select
>Run>Run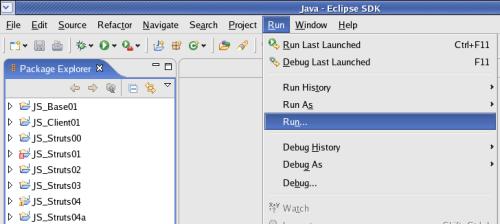
If
you have already registered the runnable Class, skip this step and
continue with
this step.
If
you want to run the Class for the first time, you have to register
it.
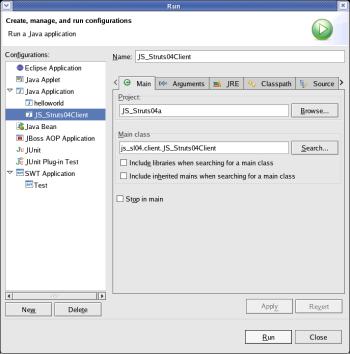
To register the Class, select Java
Application and click the
[ New ] button.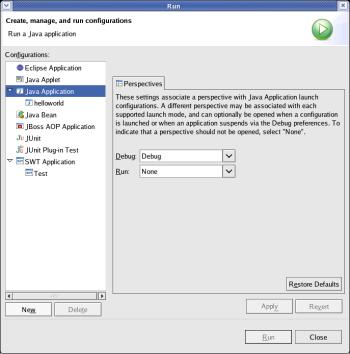
On
	the parameters for the 'New_configuration' enter a 'Name'
	(JS_Struts04Client)
	and select the 'Project' and the 'Main class'.
Finalize the entry
	by clicking the [
	Apply ] button.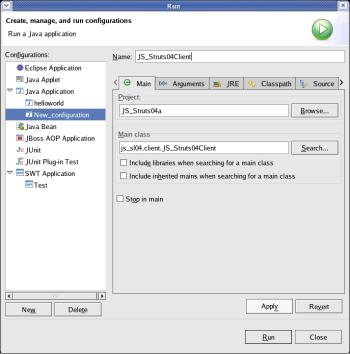
As
	some external libraries are needed, select the tab 'Classpath',
	select 'User Entries' and click the
	[
	Add External JARs... ] button.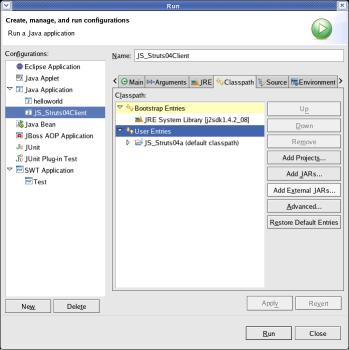
On
	the following window manouvre to the directory /opt/jboss/client
	(if JBoss is installed in /opt/jboss; in case of another
	Java-Application-Server; for another installation-directory manouvre
	to the corresponding directory).
Select
	'jbossall-client.jar' and click
	the [ OK ]-button.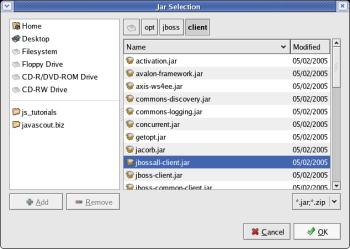
Repeat
	the previous two steps to select
	'jnp-client.jar'
The
	added libraries will be reflected.
Finalize
	the entry by clicking the [
	Apply ] button.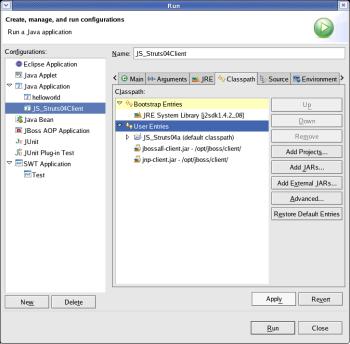
After
	the hidden compiling and executing of the code, the Console-window
	in the lower part of Eclipse starts with the user-dialog.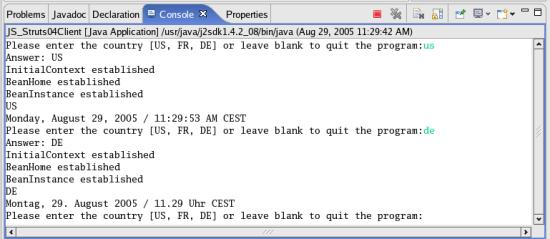
Pack
into a JAR (Java Archive):
Select
>File>Export
Select
	the kind of of archive you want to build and click the
	[Next] button.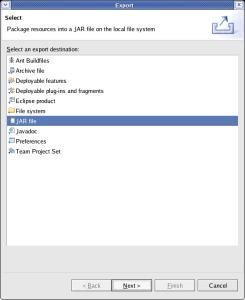
Expand
the Project ('JS_Struts04a')
you want to pack into
the archive by clicking onto the the little
triangle on the left and mark the 'src/java' folder.
Note:
This might sound strange as the java-class to be pakced is in the
'gen/classes' folder. Nevetheless, the export-routine of Eclipse
knows that it has to take the class-file even if the source is
selected.'Select
the export destination', i.e. enter the directory were the jar-file
will be stored and the file-name.
Leave all other selections
unchanged.
Click the [Next] button.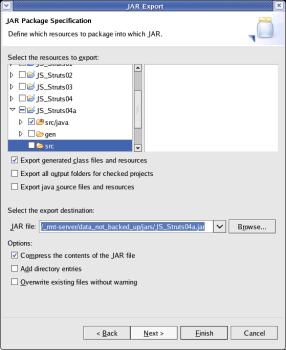
Unmark
	'Export class files with
	compile errors'.
Leave all other selections unchanged.
Click
	the [Next] button.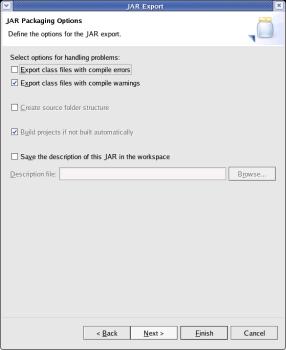
Select
	the 'Main class' using the
	[Browse...] button or type it into the
	entry-field.
This will start the class immediately after the
	Java-Run-Time finished loading the JAR-file.
Click
	the [Finish] button.
Note: This action is of no use at the
	time of writing this tutorial as the Java-runtime does not allow to
	specifiy a 'Main class' if the classpath comprises several jar-files
	(explanation of the classpath see later).
As there is hope, that
	future versions of Java will capable to select a single 'Main class'
	our of several jar-files, the definition is covered already now.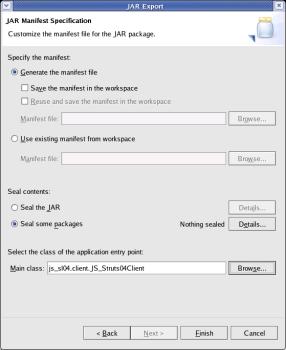
top.
Run
/ Test, Part 2:
As
there have to been classes, which are distributed in several
jar-files (Java-ARchives), to be incorporated, the parameters for the
Java-command are not as
simple as in the lesson JS_Base01
- HelloWorld.
All
jar-files have to be 'collected' in a so called 'classpath'. This
classpath can then be searched by the Java-Runtime when a class has
to be loaded dynamically.
For a real application it
is recommended, that the jar-files supplied by the
Java-Application-Server are left in their original directories and
the classpath contains the fully specified directory- and
file-name.
For this lesson, the jar-files needed are copied to a
common directory from where the client-program will be started.
Changing
	to the common directory and copying the jar-files (libraries) from
	the JBoss-Application-Server
	to the common directory

(/_rmt-server/data_not_backed_up/jars).
     cd
	/_rmt-server/data_not_backed_up/jars
     cp
	/opt/jboss/client/jbossall-client.jar ./
     cp
	/opt/jboss/client/jnp-client.jar ./

(The
	above commands assumes, that the JBoss-Application-Server
	was installed in directory /opt/jboss).
Copying
the jar-file (library), build in tutorial
JS_Struts04
– Creating the Session-Bean with the 'Model'
(with
the classes for this client) the common directory cp
/home/kurti-o/js_tutorials/JS_Struts04/JS_Struts04EJB-client.jar
./
(The
above commands assumes, that the workspace for Eclipse
is in directory /home/kurti-o/js_tutorials
Start
the Java-runtime with the jar-files and the class with the
main-program java
-cp
JS_Struts04EJB-client.jar:jbossall-client.jar:jnpclient.jar:JS_Struts04a.jar js_sl04.client.JS_Struts04Client
The
above classpath-delimiter (:)
between the files is LINUX-specific; for other operating-system it
might be different..
and
the user-dialog starts. 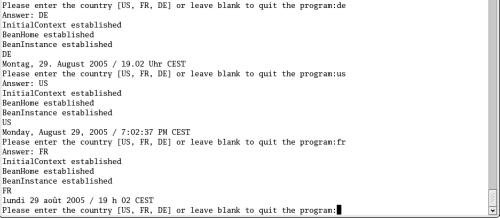
Related
Documents: