
|
>
Service-applications for the Server |
|
Last
revision of this document: |
This document gives instructions to activate and configure the SAMBA-server-demon.
The
Standard-Application-Message-Block-Architecture-Server provides the
defined directories as network-drives.
With this method,
computers in the network with Windows** as operating-system can use
the network-drives like local drives.
Additionally printers on the
Server can be defined to be shareable for other computers in the
network.
The SAMBA-server enables users on computers with the operating-system Windows*, to access the directories accessible for all users (see 'Linux - file-structure and users') and printers connected to the Server.
Operating-system installed ;-).
The file- and user-structure as described in the document 'Linux-Server - file-structure and users' is already implemented on the Server.
Programs
for Samba and SWAT installed on the Server; this can be checked with
the following commands:
which
swat
respectively
which
samba
Useful
hint: To install packets of the RedHat**-packet-manager (rpm), I
use the installation-option 'Upgrade Existing Installation' and
select the packets to be installed by anwering [Yes] on the screen
'Customize Packages to Upgrade' thereafter.
samba-client,
samba-common
and samba-swat
are found under Applications/System.
This procedure does not work under Fedora Core 3. In this
case use the installation with RedHat**-Packet-Manager (rpm) as
described below.
If a printer is connected to the Server and this printer should be accessible to other computers via SAMBA, this printer must already be installed as 'local printer' on the Server.
Installation-instructions:
Install the Samba-Web-Administration-Tool (SWAT) with the RedHat**-Packet-Manager (applicable for Linux Fedora-Core-3)
As mentioned under
Prerequisites ,
the SWAT has to be installed with the RedHat**-Packet-Manager.
To
do so, perform the following steps:
* Insert CD 4 into the CD-ROM
drive.
The CD will be automounted and the CD-icon is visible on
the GNOME-dektop.
* Click with the right mouse-button onto the
CD-Icon and select 'Browse Folder'.
* Manouvre into the directory
/Fedora/RPMS
.
* Find the icon for the the file
samba-swat-3.0.8-0.pre1.3.i386.rpm
and click it with the right mouse-button and select
'Open with “Install Packages”'.
Follow the
instructions of the installation-process.
The number of the CD and the version may differ depending on the version of the Fedora-Core.
Automatic start of the SMB-server-demon and the Samba-Web-Administration-Tool (SWAT)
To configure automatic
startup the command
ntsysv
is
executed on the command-line.
On the following 'Services'-menu the selections [ ] smb and [ ] swat are marked with the space-bar and the and confirmed with the OK-button.
Configuration of SWAT
SWAT is the SAMBA-Web-Administration-Tool; which allows to configure a SMB-server over a web-browser on any computer in the network.
That SWAT can be called from any computer in the network, the configuration-file /etc/xinetd.d/swat must look like following:
service
swat
{
disable = no
port = 901
socket_type = stream
wait
= no
# only_from = 127.0.0.1 //SWAT should be callable from any
PC
user = root
server = /usr/sbin/swat
log_on_failure +=
USERID
}
To avoid a shutdown and
restart of the Linux**-Server, the new configuration can be activated
immediately by restarting service xinetd
with the following command:
service
xinetd restart
Configuration of the SMB-Settings:
Further settings of the SMB-server can be done on any computer in the network (which has TCP/IP and a web-browser installed).
To
configure the SMB-server, its TCP/IP-address and the port 901 is
entered as URL (1) on the web-browser.
A window opens where the
entering of user-name and password is requested (2).

Configuration of global SMB-Values
After clicking onto the icon 'GLOBALS'
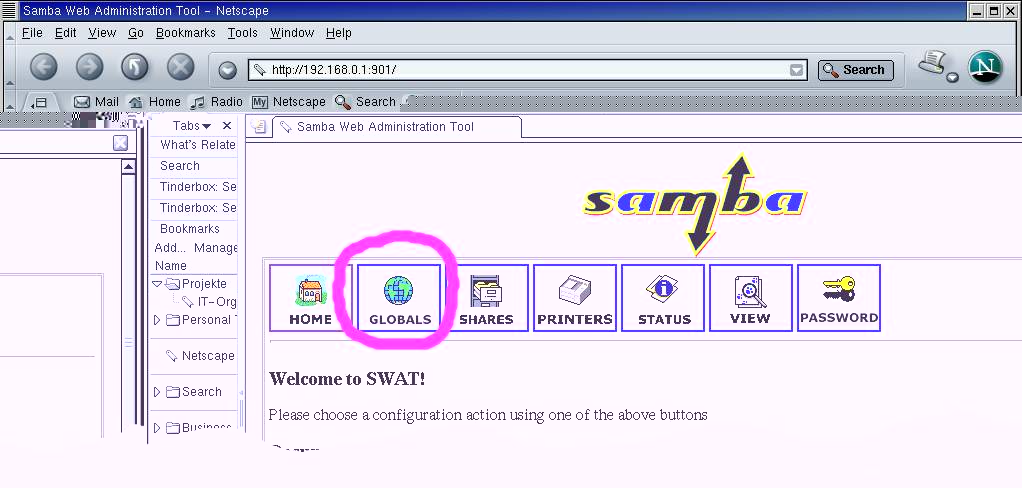
the page for 'Global
Variables' will be shown.
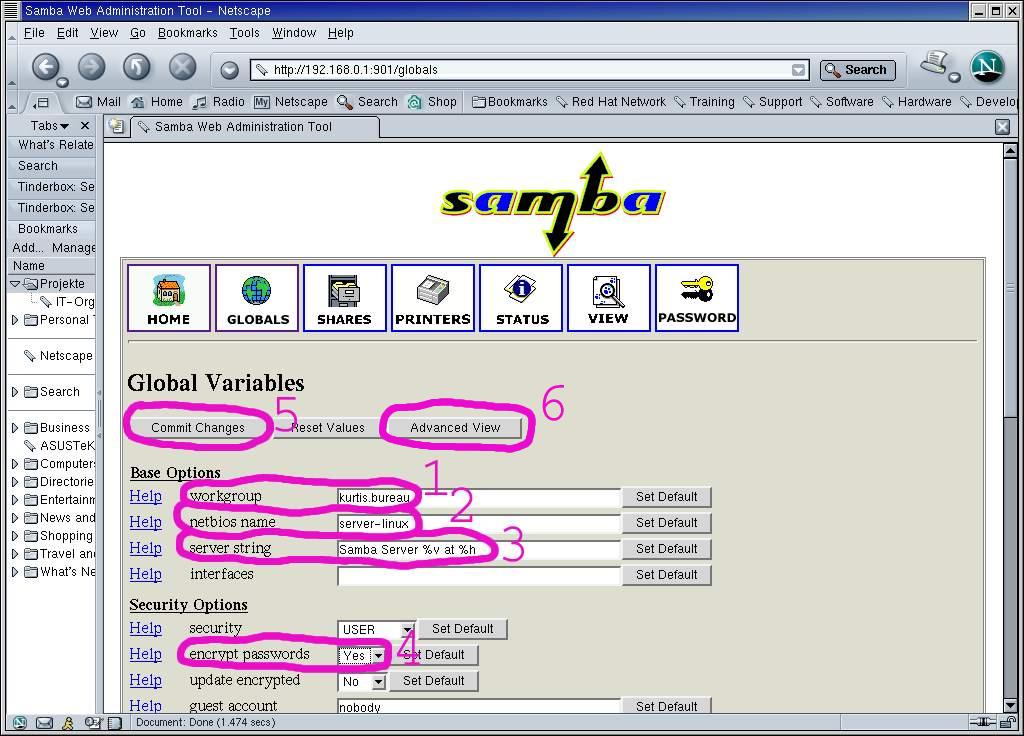
On this page the following settings of
configuration-parameters can be entered:
(1) 'workgroup': The name
of the workgroup the server will be a member of.
(2) 'netbios
name': The unique name of the Computer within the workgroup.
(3)
'server string': Descriptive name of the computer; it is recommended
to enter the string 'Samba Server %v at %h'.
This leads to a
display including the netbios-name and the version.
(4) 'encrypt
passwords': selection 'yes'.
All other settings will be unchanged and the changes are commited by clicking the button 'Commit Changes' (5).
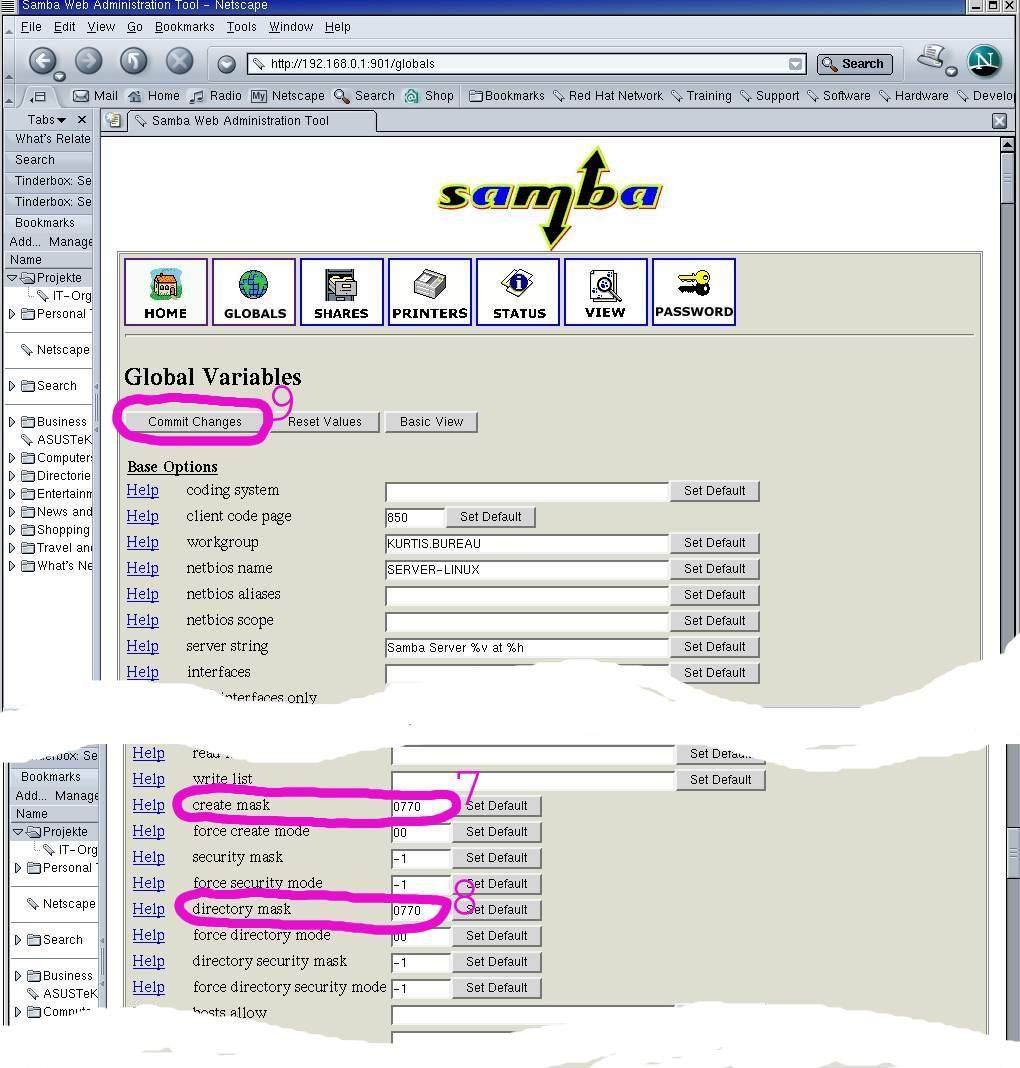
After committing the
changes, the button 'Advanced View' (6) is clicked. This results in
showing a mask with extended settings.
The following parameters
will be changed:
(7) 'create mask': new value '770'.
(8)
'directory mask': new value '770'.
The changes will be commited by clicking the button 'Commit Changes' (9), too.
Aktivation of changes
To activate the change of a configuration-parameter-setting, a Restart of the SMB must be performed.
This restart can be done at any by clicking onto the icon 'STATUS' and
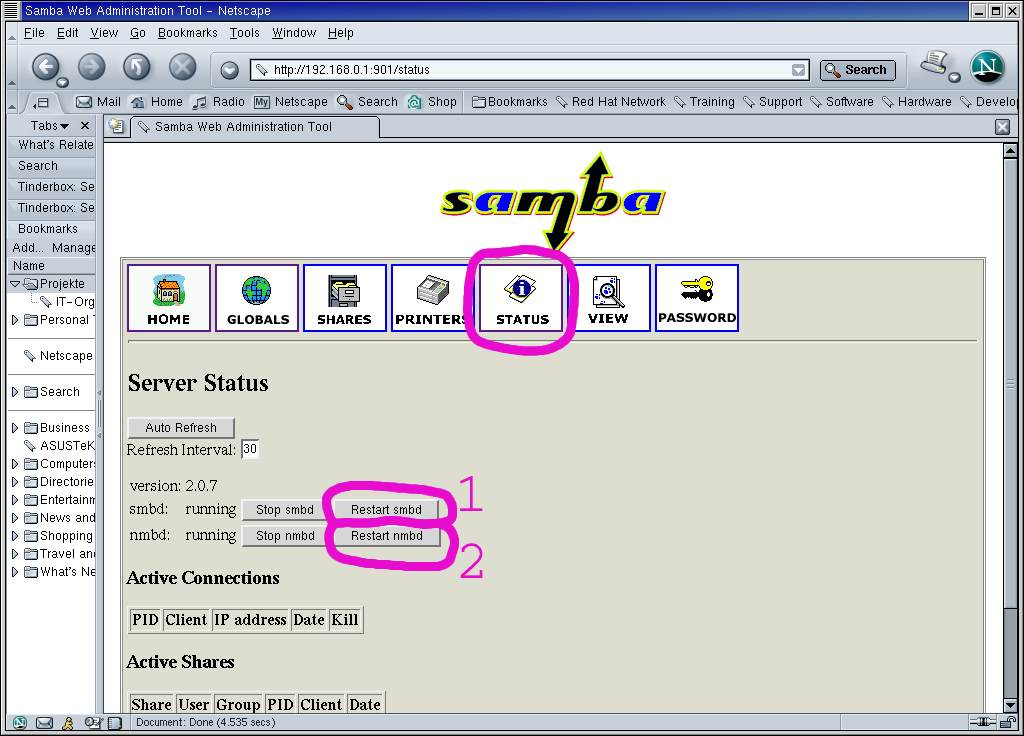
on the displayed page clicking the buttons 'Restart smbd' (1) and 'Restart nmbd' (2).
Keying in passwords
The keying in of the passwords has to be done for all users als listed in the document Linux – file-structure and users .
To do this, after clicking onto the icon 'PASSWORD', the user (1) and its chosen password (2) (3) is keyed in on the displayed page.
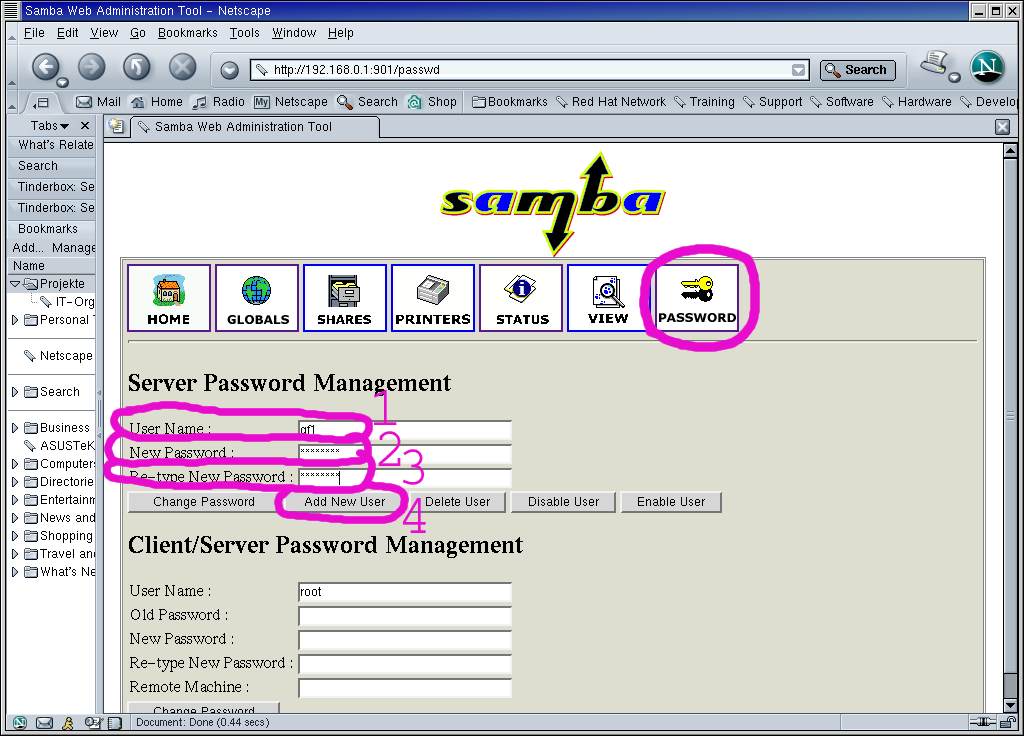
The setup of a new user is committed by clicking the button 'Add New User' (4).
After clicking onto the
icon 'PRINTERS' the page for 'Printer Parameters' will be
displayed.
After selecting a printer installed at the server using
the combo-box (1) and clicking the button 'Choose Printer' (2) a page
with the setting-options for the configuration-parameters will be
displayed:
On this page the following settings will be keyed
in:
(3) 'comment': descriptive-name of the printer; it is
recommended to use the string 'Printer xxx at %h'; this will show the
netbios-name of the SMB-server.
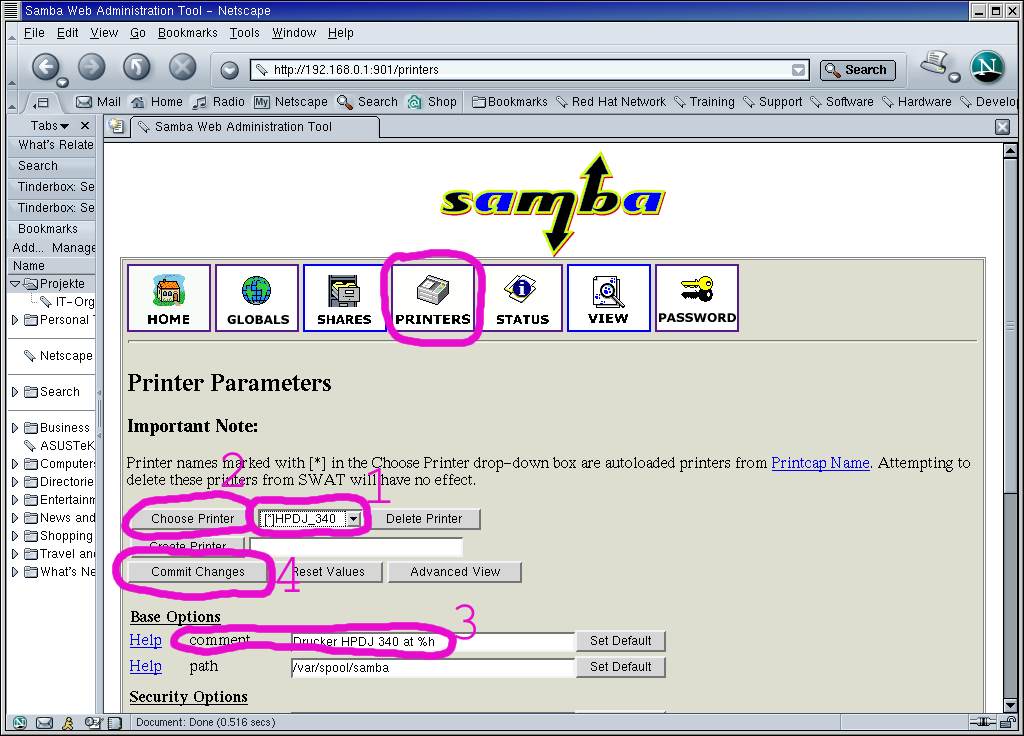
All other settings will be left unchanged and the changes will be committed by clicking onto the button 'Commit Changes' (4).
Additional hint:
Under
RedHat**-Linux** Version 9 there is a bug which allows the setup of a
printer under SMB but the printer does not print due to missing
command-strings in the smb.conf
file. A bugfix is described in document Printer
Setup under RedHat-Linux 9, part
SAMBA-Bugfix in
RedHat**-Linux** 9.
Definition and configuration of network-drives
The configuration of the network-drives must be done for all directories listed in 'Linux – file-structure and users') .
After clicking the icon 'SHARES' the page for 'Share Parameters' will be displayed.
First the SMB-ressource-name (which is given to the network drive) will be keyed in and confirmed by clicking the button 'Create share' (2).
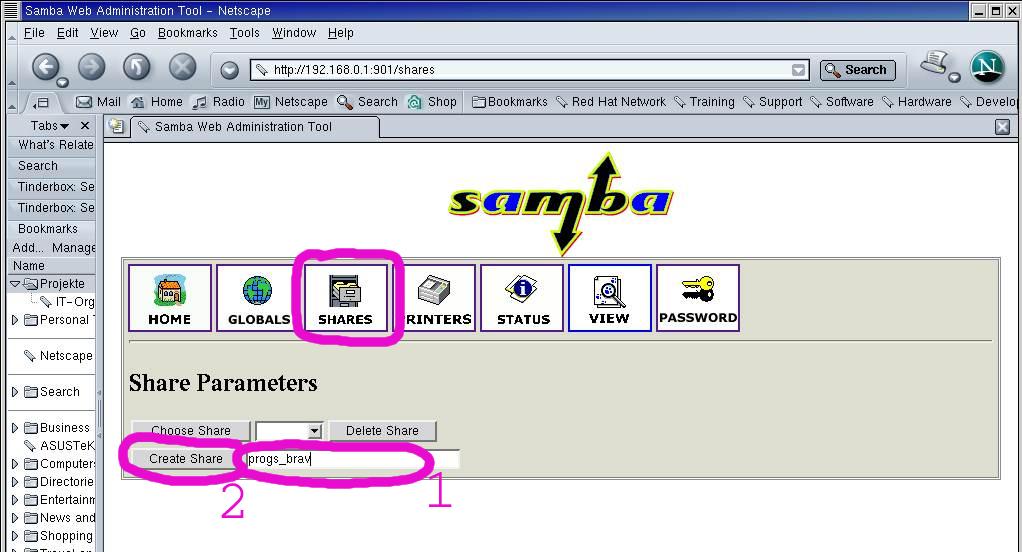
Thereafter
a page is displayed which allows the entry of addional
configuration-settings:
(3) 'comment': descriptive name of the
network-drive; it is recommended to use the string 'xxx at %h'; to
include the netbios-name of the SMB-server in the display.
(4)
'path': directory on the SMB-server which will be used as
network-drive.
(5) 'writeable': selection 'yes'.

All other settings are left unchanged and the change is committed with 'Commit Changes' (6).