Using the CUPS Printing
System under Fedora Core 3
This document
describes the setup of a CUPS (Common Unix Printing System) daemon on
a machine with a connected printer and the usage of the remote
printer(s) from another machine (usually a Workstation).
Overview:
Installation
and configuration of the CUPS server (daemon)
Using
a CUPS server from a Workstation
Preface:
CUPS
– a good idea with a very week documentation for beginners !
First
for the good idea:
The
creators of the Internet Printing Protocol (IPP), which CUPS uses,
had the following ideas:
* Keep the printer drivers at the
machine where the printer is actually connected to.
   From
there, any machine that wants to use the printer can load the
driver.
   This avoids the installation of printer
drivers at numerous machines that want to use a networked
printer.
* Each CUPS-server broadcasts the printer(s) that
are operational at its machine.
   This allows each
machine in the network to keep the list of available printers
updated.
   Further it avoids loss of time to
search a printer when the print-job has to be started.
* At
last, it allows a 'clustering of printers'; that means two or more
printers forming a cluster.
   This cluster is
visible like a single printer to application programs.
   CUPS
distributes the print jobs to the printers within the cluster and
even recognizes if a printer is no longer available.
The
later feature brings CUPS to the world of 'enterprise servers' were
you can set up a 'farm of printers' with failover capabilities.
The
feature of broadcasting is more sophisticated – particularly if
you use a WLAN (Wireless Local Area Network).
It may attract
jokers. As soon as they cracked the encryption of your WLAN, they see
all available printers and might fill up the printing queue with
paperwasting jobs.
And
now for the week documentation that made the setup of CUPS a
nightmare for me:
That
is my opinion after hours of trial to make this system work to behave
like SaMBa.
When I read the
documentation of CUPS (http.//www.cups.org),
I felt like I should enter a train passing by the station with at
least 50 km/h.
There were a lot of parameters in the configuration
file (/etc/cups/cupsd.conf) –
and no ranking of the priority (which can be left at the default
value and which parameters are inevitable to adapt the system).
After
hours of reading postings on the web, I formed a view on the fact
that CUPS and RedHat-distributions do not cooperate very
well.
Instead of fixes for the weaknesses of others I found some
postings pointing with the fingers to each other.
Finally
I found the essential article that solved my problem – a big
'Thank You' to the anonymous author of the article mentioned under
Credits.
Credits:
An
article that is very helpful to identify the parameters that have to
be adapted to your system.
And the essential hint to open the
CUPS-server to communicate to other machines on the
network.
http://gentoo-wiki.com/HOWTO_Linux_printer_sharing_with_CUPS
A
BIG Thank You to the anonymous author !
Installation
and configuration of the CUPS server (daemon)
Prerequisites:
Installation-instruction
Start
the CUPS server automatically
Usually,
the CUPS-server should automaticallybe started during start-up of
Linux.
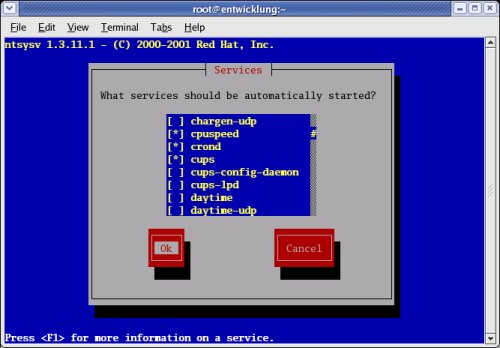
To check if CUPS is in the list of services to be started,
open a 'Terminal' window and enter
ntsysv
On
the listed services, check that [*]
cups is marked.
If you are not sure, that you really
need them (the chance is very rare), unmark [ ]
cups-config-daemon and [ ]
cups-lpd .
Those two service might cause
problems with other services.
Use
the TAB-Key to select [ OK ] and press the
ENTER-Key thereafter. to
save the configuration.
Exit
the 'Terminal' and, if it is not to inconvenient, restart Linux to
have the selected service running and the deselected service
switched off.
Check
if the printer is already configured – or configure it for CUPS
Open
a browser and enter the url 127.0.0.1:631/printers

If
you get an error, there might be something missing in the CUPS
configuration file (/etc/cups/cupsd.conf).
Go to the paragraph dealing with the configuration file and
verify, that all mentioned parameters are set as described in this
document.

If
there was no printer installed till now, use the web-interface of
CUPS to define the attached printer.
N.B.:
To install a
printer using cups makes only sense if you use one of the older,
popular models where the driver is included in the
CUPS-package.
Otherwise it is not possible to do a final printing
test.
If you are in doubt now, I suggest that you first locally
install your printer (see document Printer
setup under RedHat**-Linux** 9 or Fedora Core 3) and then
do the step above to check if CUPS recognized the printer.
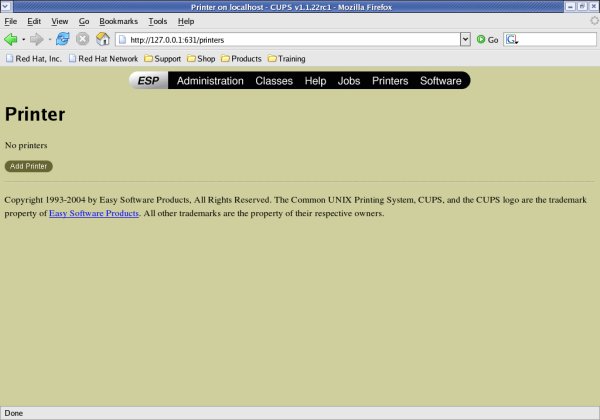
Click
onto [Add printer].
At
the following screen enter
* Name - that is the name, the
printer can be adressed by other machines,
* Location –
a descriptive comment were the printer is located and
* Description
– a comment of the printers assignment.
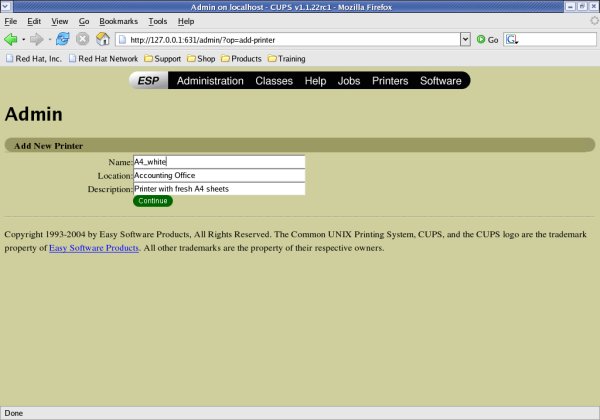
Click
onto [Continue].
From
	the Combo Box, select how the printer is connected.
As the
	printer was not auto-detected, it is obviously an older model and
	therefore connected over the 'Parallel Port'.


Click
	onto [Continue].

N.B.:
There might be very
	rare cases that a printer is connected over a 'Serial Port' or is an
	'USB Printer' which was not auto-detected.
All other choices are
	very special connection methods – and if you need them, I
	guess you are a System Administrator.
In that case I suggest,
	you to familiarize with the documentation under www.cups.org
	;-).
The
next 2 screens allow to select the Make and the Model of the
printer.
Do not be confused if your printer is not listed
there !
That is, that the basic CUPS package would be to
voluminous if it would include all printer-drivers.
So printer
drivers for the CUPS-standard can be downloaded individually.
If
you are a 'Home-User' and you just want to connect a few
machines in your house, I suggest to use the driver included in the
Linux**-distribution of your local machine (described in the section
Using a CUPS server from a
Workstation) instead of loading the driver from the CUPS
server.
Usually the Linux**-distributions contain all popular
printers where a driver for Linux**exists.
If you are a 'System
Administrator' and have some, e.g. high volume, business printers
and dozens of Workstations under your responsibility, then also
select the 'Generic' option and consult the CUPS-documentation for
downloading and installing CUPS-compatible printer-drivers.

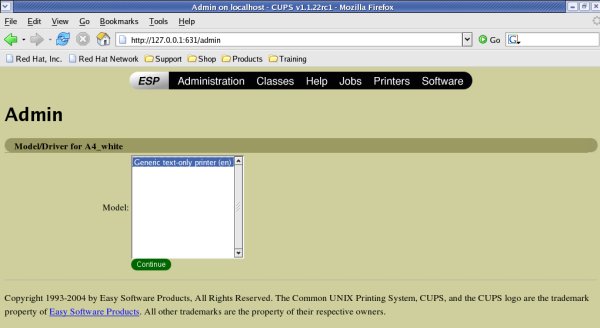
Do
not forget to click onto [Continue] after each selection.
Finally
you get a confirmation screen.
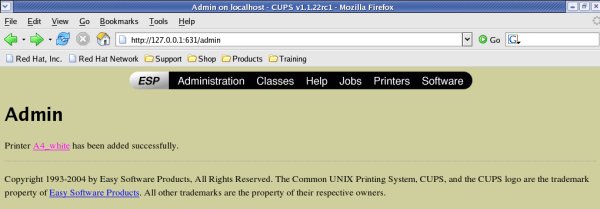
Click
onto the Name (A4_white in this
example) to get to the printer screen.
Finally,
	a test-printout is made.
To test the printer makes only sense,
	if you were able to select the correct driver for your printer
	model.
Otherwise the printer is supplied with data it is not
	able to work with and – in the best case – nothing at
	all will be printed or – in the worst case – hundreds of
	sheets are filled with starange looking characters.

To do the
	test, click onto the [Print Test Page] button.


If
	you do not get the CUPS test-page or you do not get anything at all,
	there might be something wrong with the connection or with the
	underlaying services for printing.
To isolate the cause of the
	failure, I recommend to install the printer with the Printer
	Configuration Tool described in document Printer
	setup under RedHat**-Linux** 9 or Fedora Core 3.
Change
the configuration file so that the CUPS server accepts print jobs
from other machines within the network.
The
configuration file contained in the CUPS package is configured for
very tight security – so the CUPS-server just accepts orders
from the machine where it is running.
Of course, this contradicts
to the idea of CUPS.
On the other hand, if you operate a WLAN
(Wireless Local Area Network), a joker from the street may break into
your network and manipulate unsecured areas of CUPS.

So the
configuration is opened a little bit to accept print jobs from other
machines within the local network and allow users within the network
to reprint or delete print-jobs.

The requirement is:
*
Allow administration tasks only from the local machine; that prevents
that printers are deleted or manipulated.
* Allow all users on the
network to print, view and manipulate print jobs without further
identification.
   This bears the risk that a
joker, who broke into your network, can delete print-jobs or using up
all your paper over the weekend.
   I think that is
tolerable for a small office or home office, as the low-cost printers
do not have too much paper loaded which can be wasted by a joker.
To
change the CUPS configuration file use an editor and open
/etc/cups/cupsd.conf and
find and change the parameters listed below.
The
most important changes are:
Listen
*:631 (at the bottom of the file)
This instructs the
CUPS server to accept requests from all machines in the network.
Browsing
Off (at the bottom of the file)
This inhibits that the
list of configured printers is broadcasted. Therefore it is much
more difficult for somebody, who broke into the network to find a
printer and joke around with it.
The next example is
sensitive to the 'Name' you gave to the installed printer and the
TCP/IP-range your local network is in.
In the example the 'Name'
is 'A4_white'; please replace it if your printer has another 'Name'
(e.g. 'lp0').
The local area network uses the range
'192.168.0.*'.
The section can be found close to the bottom of
the file.
<Location
/printers/A4_white>
Order Deny,Allow
Deny From All
Allow
From 127.0.0.1
Allow From 192.168.0.*
AuthType
None
</Location>
A
printer can only be adressed if the TCP/IP-address of the machine
and the symbolic name of the printer is known.
On the other
hand, jobs can only be monitored and cancelled from a web-browser
running at the same machine as the CUPS server.
To make the
changes effective, open a 'Terminal' window and enter
service
cups restart
If this stage is sufficient for you,
you might skip to Using
a CUPS server from a Workstation and install a printer.
Changes
to see printers and jobs are:
<Location
/>
Order Deny,Allow
Deny From All
Allow From
127.0.0.1
Allow From 192.168.0.*
AuthType
None
</Location>
To
make the changes effective, open a 'Terminal' window and
enter
service cups restart
Further, it allows jobs to
be cancelled and, if the job is preserved (se next step), to restart
a print-job.
If the CUPS server is running on the machine with
TCP/IP-address 192.168.0.254, then enter at the web
browser:
http://192.168.0.254:631
Changes
to preserve jobs and allow a reprint of a job are:
Find
the following parameters, uncomment them and set the values listed
below
PreserveJobHistory
Yes
PreserveJobFiles Yes
MaxPrinterHistory 50
To
make the changes effective, open a 'Terminal' window and
enter
service cups restart
Changes
	to preserve jobs and allow a reprint of a job and
changes to
	limit the demand of CUPS for harddisk space are:
The
	following parameters limit the damage jokers can do by limiting the
	number of active jobs.
So, if a joker breaks into your network,
	he can not fill up the job-queue unlimited.
These values are
	suggestions and may be changed by you if they restrict business
	operation.
MaxCopies
	10
MaxJobsPerPrinter 10

The
	following parameters limit the demand for space on your
	harddisk.
This might be helpful if designated an older machine
	with less than 10 GB harddisk as a print server.
Please see the
	comments at file /etc/cups/cupsd.conf
	for the effect of each parameter.
MaxJobs
	50
MaxLogSize 200000000

To
	make the changes effective, open a 'Terminal' window and
	enter
service cups restart
To
top of document.
Using
the CUPS server from a local Workstation
The
description in this section is mainly identical with
Printer
setup under RedHat**-Linux** 9 or Fedora Core 3 | Setup of a local
printer under GNOME.
Therefore,
not all steps are supported with screenshots - just the ones dealing
with the difference when using a printer on a CUPS server.
RedHat**-Linux**
Version 9 offers an assistant to set up a printer with a graphic
tool.
N.B.: The setup was performed under GNOME - I did not verify
if there is a similar option under KDE.
Prerequisites:
Installation-instruction:
The
assistant is started by navigating to > System Settings >
Printing.
After
clicking onto 'Printing', the 'Printer configuration' window
appears.
To configure a new printer, click onto the [New]
icon.
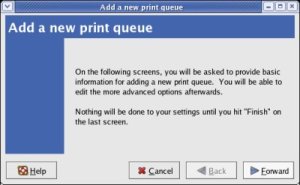
The
following window appears. The message is confirmed by pressing the
[Forward] button.
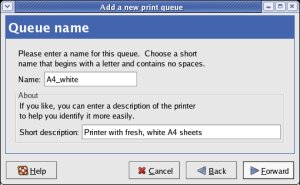
The
following window allows to enter a name and a descrption for the
printer to be installed.
The entered values are confirmed by
pressing the [Forward] button.
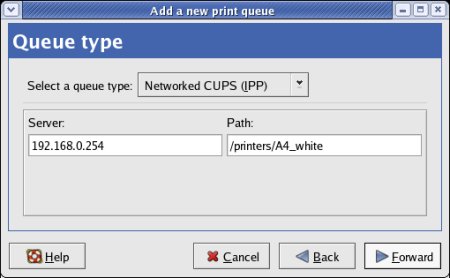
On
the next window, the kind of 'queue type' (Networked CUPS (IPP) in
this case) is selected.
After selecting this, the window changes
and shows entry fields for
* the 'Server' where CUPS is
running   and
* the 'Path'; that is the symbolic name of the
printer – given when the CUPS server was set up in the section
before.
After
entering the values and pressing the [Forward] button, the
installation process continues as described in
Printer
setup under RedHat**-Linux** 9 or Fedora Core 3 | Setup of a local
printer under GNOME.
Additional hints:
When
the setup-assistant completes the installation procedure there is
frequently an error-message that the test-page could not be printed.

It is suspected, that some task are already starting while
prerequisite one are not yet completed.
Test:
On
the 'Printer configuration' window, select the printer to be tested
and select > Test > CUPS test page from the
drop-down-menu.

A
test-page will be printed thereafter.